This blog is no longer hosted on this site. Check out the new and improved Domestic360 at domestic360life.com for even more DIYs, recipes, and fashion tips!

Thursday, December 20, 2012

Thomas the Tank Engine Play Mat - DIY Sewing Tutorial

My nephew is obsessed with Thomas the Tank Engine. He is almost two years old and he can't get enough of that blue "Choo choo!" He has shirts, and movies, and toys. For Christmas I really wanted to make him something that he would love. I took the idea of those travel Match Box Car road play mats and tweaked it to make a train mat.


Its a pretty simple idea. Just two pieces of fabric sewn together with a map on one side. I painted the train tracks and did simple felt appliques for the lake, houses and mountain. The great thing about felt is that you can just cut it and stitch/glue it in place. There are no raw edges so there is a lot less work. If you don't want to sew felt, just paint on whatever landmarks you want on your map.


That's the cool thing about this project, you can make the map look like whatever you want it to look like. If you want lakes and rivers, just put them on there! If you want a whole village, just cut out some village shapes (squares and triangles for houses are so simple) and glue them on the map. You could even have train tracks going from your home to "Grandma's," just paint labels under the houses. Its so easy to make this a totally custom play mat!


What You Will Need:

  • mat background fabric (I used green to look like grass) cut a 21" x 21" square
  • mat border fabric (I used blue clouds) cut four strips of 2" x 21"
  • mat back fabric (I used Thomas the Tank Engine fabric) cut a 23.5" x 23.5" square
  • snap fabric (I used the same as the border fabric) cut a 3.5" x 4" rectangle
  • small bits of felt 
  • fabric paint
  • embroidery floss
  • one button (optional)
  • one square of Velcro (both male and female sides) or a snap set
  • the usual stuff (sewing machine, matching fabric, scissors, ruler etc...)
Note: Use a 1/4" seam allowance unless otherwise noted.


Plan out what you want your map to look like. I did a very simple sketch so I knew what I was working towards. Once you have a plan you can get started with the map details. Cut out shapes such as squares and triangles for houses, an organic triangle for a mountain, and a blob shape for a lake. Either glue or stitch these landmark details in place. Add whatever shading or detailing you want. Now, paint on the train tracks. The tracks should be 1.5" wide. I used a small piece of paper that was 1.5" wide so I could make sure the width was even. Neither the landmarks nor the tracks need to be perfect. Let your paint and glue dry completely (overnight is best) before moving on.
 
Sew on the borders. First sew on the top and bottom borders, line the edge of the border fabric up with the edge of the map fabric, right sides together. Press the borders open (see the first picture). Then sew on the two side borders using the same method, these will be longer than the top and bottom borders because they will over lap the top and bottom borders. Press these open.


Fold the snap tab fabric in half length wise, right sides together. Stitch up the raw edges and one end, leaving one end open. Trim the seams to about 1/8". Turn the tab right side out, poke out the corners with a dull pencil or corner turning tool and press.


Stitch the male side of the Velcro square in place at the finished end of the tab. (If you are using a snap this is where you would attach the female side of the snap in stead of the Velcro.)

Stitch a button on the opposite side of the tab from the Velcro. This button is just for show and won't be functional, so don't worry about it being very tight.


Layer the back fabric and the map right sides together. From the bottom left side (where I have my lake) of the map, measure 6" in and lay your Velcro tab with the button facing up (like in the picture). Pin this in place in between the two layers of fabric. Stitch around the whole map through the map border fabric and the back fabric making sure to back stitch. Leave a hole about 4" for turning.


Trim the corners Turn the whole thing right sides out, pushing out the corners with a dull pencil or a corner turner. Turn the raw edges you left for turning inside, press. Press around the whole map. Top stitch, as close to the edge of the fabric as possible, around the whole map (making sure to catch the raw edges that were left for turning). Stitch the other Velcro square to the back of the mat 6" from the top left corner.


That's it! It such a cute gift for a little boy who loves trains.

Wednesday, December 19, 2012

Gift Card Envelope - DIY Tutorial

My mom always says that gift cards are impersonal. I disagree. I love gift cards. I love how easy it is to give them and I love getting them and spending them. Its like guilt-free shopping. When we got married we got so many gift cards and it was awesome! We were able to get so much stuff that we needed, even stuff that wasn't on our registry.

The only thing I don't like about gift cards is that they are impossible to wrap and the little envelopes they come in are ugly. There are some cute cards and little tins you can get to put your gift cards in, but who wants to pay extra for that?

So, my solution is to make my own little envelope! It only takes a little scrap of fabric and about 30 minutes to make.

What you will need:

  • One piece of fabric (quilting cotton works really well) - 13" x 3.5"
  • The usual stuff (a sewing machine, matching thread, scissors, an iron, etc...)

Fold the fabric in half length wise, right-sides together. Stitch around the three raw edges using the edge of the foot lined up with the edge of the fabric as a seam allowance, back-tacking and leaving a hole for turning. 

Cut the corners, being careful not to cut the threads.

Pull the fabric though the hole so that its right sides out. Poke out the corners with a corner-turner (or a dull pencil).

Fold the raw edges from the turning hole to the inside. Press all the way around, making sure that the seams are pushed all the way to the edge.

Stitch along the edge of the envelope to close up the hole that was left for turning. I did two lines of stitching, one using the edge of foot, edge of fabric and one as close to the edge of the fabric as I could get. If you want you can just stitch as close to the edge of the fabric as you can.
 
Fold up one half of the envelope 2 and 7/8" to form a pocket. Press and pin.

Stitch around three edges as close to the edge of the fabric as you can. Make sure to back-tack. 
Slip in a gift card and you're DONE!

Tuesday, December 18, 2012

Easy Christmas Punch Recipe


This is so simple and delicious. You can make a single serving or a whole punch bowl's worth. We served it with chocolate fondue and a simple cheese plate. 


Raspberry Sorbet
Ginger Ale or Champagne
Strawberries for garnish

Using a small cookie scoop or a melon baller, put a few scoops of the sorbet into your glass. Top off with ginger ale or champagne. Add a strawberry and drink!


Monday, December 17, 2012

7 Days 'Til Christmas - Oh Geeze!


Here's a preview of whats to come this week: 

Christmastime in Colonial Williamsburg - Days 15 & 16

This past Saturday our family got up at 4:30 am and headed down the road to Colonial Williamsburg. We started going to Williamsburg when I was around 9 or 10 years old. Its a magical place. I really believe that these early visits to Williamsburg is where my love of costuming and history stems from. I loved dressing up and talking to all the interpreters. I couldn't get enough of this place. Fast forward 15 years and I still love the costumes (though, I don't dress up anymore) and the history, and the houses, and the magic of it all.


For as long as I can remember my mom has been talking about wanting to go down to Williamsburg for Christmas. If its a magical place the rest of the year its especially magical at Christmas time. There is something about the holidays that brings out the best in people and in the places that they inhabit. Everything is dresses up in beautiful greenery and twinkling lights. There is hot cider and fat gingerbread men. Its a great way to get into the holiday spirit.


We stayed at the Williamsburg Inn, which was awesome. Its where the Queen Mum stayed when she visited back in the day. The service was incredible and the building and grounds was beautiful. I got lost a few times trying to find my room because all the hallways looked the same, but it was totally worth it. The Inn was originally built by the Rockefellers in the 1930's as a place for their friends and family to stay in luxury while  they visited the newly opened Colonial Williamsburg. The Inn is just a block from the main street of the museum of Colonial Williamsburg.


We spent the whole weekend walking around the small museum town taking in the decorations, eating the amazing food, and enjoying the atmosphere. One of the unique things about Colonial Williamsburg is that its not just a stagnant museum, the people who work for the foundation actually live on the campus and in the historical houses. Some of the original out houses, such as the kitchens and barns have been turned into houses and the people who live there take decorating for Christmas very seriously. 

Every year the foundation has a wreath decorating competition. There is a cash prize and a ton of bragging rights on the line. This competition insures that the buildings are all decorated beautifully. All the wreaths are unique and hugely creative. The wreaths are decorated with fresh and dried fruit, dried flowers, feathers, shells  vegetables and other items that would have been available to the original occupants of the town. Just Google "Williamsburg Wreath Photos" and see what comes up. Its amazing. 


One of the highlights of the trip was witnessing one of the coolest innovations in live theatre that I've seen in a while. Its not even a new concept, but its something that pretty much one on is doing anymore. Street theatre. Virginia Theatre Machine is a two man show out of a traveling trailer that is set up and broken down every weekend in the town square of Williamsburg. 

Their Christmas show is a 30 minute version of a Christmas Carol done with puppets and clever gimmicks. Its a bit loud and silly for my usual preferred style, but that is what is required for drawing and keeping an audience who is standing in the street in the cold for 30 minutes. I was really impressed with the production quality and the script (which is reworked every year to keep things fresh), and the acting of the man who played Scrooge and did all the voices for the other characters which were portrayed by puppets.


I can't recommend Colonial Williamsburg at Christmastime highly enough. Its completely worth the trip. You can find plenty to for everyone in the family to do. Learning about the history of Christmas in the country and enjoying the festivities is such a great way to get in the holiday mood! 


Happy Christmas everyone! God save the King!


Friday, December 14, 2012

30 Last Minute DIY Christmas Gifts

I'm an extreme procrastinator. We're talking final paper done 5 mins before class, Halloween done 30 mins before trick-or-treating, start making dinner at 6:50 with the goal of eating at 7, kind of procrastinator. I didn't even buy a baby gate until my son learned how to scale the staircase. Its bad. I am trying to be better.

Most of the time I can get away with being so last-minute. But today it bit me in the butt. My sewing machine broke. I was planning on making all of our Christmas gifts and now I am going to have to use my mom's machine. It sets me back at least a day in my gift making.

I am thinking of making a few changes to my gift making list. Maybe not so much sewing. Maybe more bulk gifts that can be cranked out quickly. 

If you are also a procrastinator when it comes to the gift- making I have just the list for you! Here is my list of Last Minute Christmas Craft Gifts.

Crafts to do with Kids


Christmas Tree Decorating on the Cheap! - Alternative Christmas Trees - Lots of DIY ideas


I am blaming yesterday's lack of a post on the fact that it was the 13th. I had a plan for what I was posting and it just never ended up happening. Anyway... Here is my make up post!

We are trying to save as much money as we can (we want a house!), therefore Christmas is a time of homemade gifts and paper chain decorations. I thought I would share a little bit of my Christmas tree decorating cutting-corners ideas.

I love these ideas! I really hope you try some of them and that they help you save some money this holiday season!

Christmas Trees:
Last year we got a mini tree from Whole Foods (about $25), added a string of lights, a bit of silver rick-rack, and I made ornaments from paint chips. I used a paper punch (a medium-sized circle), then punched holes in the circles and added ornament hooks. The whole thing cost me about $30-$35 dollars. I think its so cute! Very home-made chic.


This year, I didn't spend any money at all on a tree! I used the lights from last year and a picture frame I found on the side of the road (I used it for Jude's birthday party, that's when it got spray painted silver). I nailed in some nails in the shape of a tree, one at the top and seven across the bottom, and just strung the lights from nail to nail. I love the way it turned out, very modern and streamlined.


Here are some other ideas I have seen around the interwebs.

On The Wall
These doesn't take up any extra floor space, perfect for an apartment!

Hang up small paintings and pictures, empty frames, and other little nick-knack in a tree shape. This one doesn't take up any extra floor space, perfect for an apartment!
From Home Spun Threads - link
Just paint an outline of a Christmas tree on a piece of plywood or even on cardboard and then stick all those holiday cards on the tree.
From Materialicious - link
Cardboard
These trees can me made from leftover boxes. Talk about inexpensive!

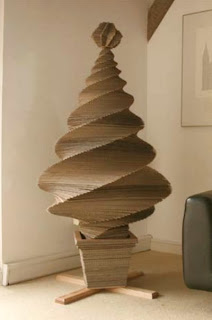
This one is kind of crazy awesome! It would take a good bit of time, and honestly I don't think I would ever put that much time into a Christmas tree, but it is an amazing piece of art that would last you years (and would earn lots of complements)! Its stacked layers of cardboard that have been carved into a swirly tree shape.

From Inspiration Green - link
I love this! you could paint it or just leave it that lovely cardboard brown. Instructables has all the directions so its not a guessing game. Add some lights to this baby and you've sold me!

From Instructables - link
These are just cut and mini, perfect for a tablescape, or to have a tree in every room of the house! Just cut out various sized squares and rectangles, paint them and glue to a foam tree base. Add a stick and a pot and you are done!
From Shelterness - link

Trimming The Tree
Spending $10 or less to decorate your whole tree!

Garland - 
  • Popcorn and Cranberry Chains - use waxed dental floss to string plain (no butter) popcorn and fresh cranberries. This is a classic! I loved watching White Christmas while stringing these up with my mom and sister.
  • Snow - string different sized cotton balls on clear fishing line. Make sure to space the cotton balls a different intervals so it looks like snow falling naturally. 
  • Paper Chains - cut strips of colorful paper and loop them together using glue or staples to secure. 
  • Mini Pinecones - use clear fishing line to string up mini pinecones. Just wrap the fishing line around the pinecone to secure, add a dot of hot glue to make sure the fishing line stays in place.
  • Paint Chips - cut circles out of colorful paint chips and sew them together, one right next to the other. 

Ornaments -
  • Paint Chips - cut paint chips into ornament shapes (Google it) or just circles and decorate with glitter glue. Poke a hole in  the top and add a hook. Its nice to glue two paint chips together so that there is color on both sides.
  • Christmas Card Recycle - save your holiday cards and make ornaments out of them. Cut out the pictures (simple shapes, such as squares and circles, look best) and add a hook. You can also add felt to the back so you don't have just a plain back.
  • Snowflakes - Cut snowflakes out of white paper and hang everywhere! Check out Google and Pinterest for patterns.
  • Mini Tree Party Hats - get cheap party hats from the dollar store. Spray paint them green and add glitter glue to look like lights and ornaments. Glue a circle of green felt to the hat to cover the opening. Add a ribbon to the top and hang on your tree.

I love these ideas! I really hope you try some of them and that they help you save some money this holiday season! Let me know how you save money during Christmas.