This blog is no longer hosted on this site. Check out the new and improved Domestic360 at domestic360life.com for even more DIYs, recipes, and fashion tips!
Showing posts with label dairy-free. Show all posts

Wednesday, October 23, 2013

Healthy Pumpkin Spice Latte in the Crockpot! (paleo - no dairy or refined sugars)

I hope you all are enjoying your fall as much as I have been. I have been loving the cool weather, the subsequent warm clothes, the changing leaves and the pumpkin flavors. I have been posting a lot of pumpkin recipes as of late, mostly because I LOVE pumpkin flavors.

Here is another pumpkin recipe for your enjoyment! This time its a healthy pumpkin spice latte. Yes, that's right, HEALTHY! The lattes you get at any coffee shop are full of nasty things for your body. Preservatives, corn syrup, sugar, oils, dairy, etc... Yuck, yuck, yuck. (Okay, I will admit that I love the Pumpkin Spice Lattes at Sbux, but my body does not.) This recipe is made with whole and nutritious ingredients: coconut milk, pumpkin puree, maple syrup, coffee and spices. All natural and yummy!

I made this in the crock pot for a Harry Potter movie night. We have been working through the Harry Potter series with a friend and my little brother. Its been a blast. I've read the books quite a few times and seen the movies just as many. I am a unrepentant Potterhead. My brother, on the other hand, hasn't read the books (goes against everything I hold dear to let him watch the movie before reading the book, but he is not a reader) so its been so fun to watch him experience the stories for the first time.

There were a few people at our movie showing that are not concerned with healthy eating, and are usually totally turned off by food that is actually good for their bodies. I didn't even tell them this was a paleo drink and they didn't notice. My little J, who is a coffee addict at two years old, loved this latte too.

This recipe made enough for the five of us enjoying the movie and about three cups for me to enjoy over the following days. The original recipe called for a really small amount of coffee and I thought that wasn't enough, so I changed that amount. I also added some maple syrup because I thought it needed a hint of sweetness. I served this with homemade whipped cream that I had in the refrigerator. Usually I would serve something like this with whipped coconut cream, but I had the whipped cream and it tasted lovely.

I would totally recommend this recipe for a cool fall day, perfect for a pumpkin carving party or trick-or-treating. I can just imagine sitting around a bonfire with a cup of this yummy drink and some roasted marshmallows. Throw in a little guitar and an impromptu sing-a-long and you have the perfect fall evening.

It would be so yummy with these paleo pumpkin chocolate chip muffins or this paleo pumpkin bread. Its great hot and chilled. I just put the leftovers into some travel coffee mugs and stuck it in the fridge. When I needed a pick-me-up through out the day I had a gourmet latte ready and waiting. The original recipe says you can make this on the stove top, but that it is better in the crock pot because the flavors have more time to meld. I haven't tried it on the stove top, but I am sure it would be fine.

What are your favorite pumpkin recipes? Leave a comment and let me know!

Happy fall!!

XOXO,
Coco


Pumpkin Spice Latte [paleo - no dairy or refined sugars]
(recipe adapted from Wellness Mama)
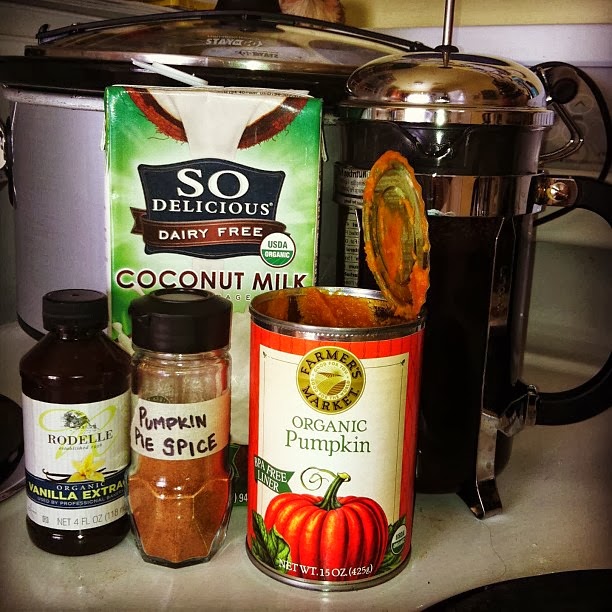
  • 4 cups of Unsweetened Coconut Milk (or 2 cans of coconut milk)
  • ¼ cup canned pumpkin (without added sugar) 
  • 2 tablespoons of natural vanilla extract
  • ½-1 tsp of pumpkin pie spice ( or ½ tsp cinnamon and a sprinkle of cloves and nutmeg)
  • 4 cup of strong coffee
  • 1/4 cup maple syrup
  • Optional topping: whipped cream or coconut cream (recipes follow)
Pour all ingredients except heavy cream into crock pot. Use immersion blender or whisk to mix well.

Turn crock pot on low for 2 hours until hot and flavors are incorporated.

Top with whipped cream or whipped coconut cream. Serve hot or chilled.

Whipped Cream: In a chilled mixing bowl whip 1 cup cold heavy whipping cream, 1 tablespoon powdered sugar (optional) and 1/2 teaspoon pure vanilla extract. Whip with a mixer or by hand until stiff peaks form. Do not over whip or you will have butter instead of whipped cream.

Whipped Coconut Cream: Put a can of full-fat coconut milk (more info on coconut milk) in the fridge for a few hours. When it has chilled remove the can from the fridge without shaking or jostling too much. Open the can and scoop out the white cream and fat that has risen to the top, be careful not to get the cloudy liquid that has settled to the bottom of the can. Now whip the creamy white coconut cream until you have whipped cream consistency. You can add a small amount of vanilla if you wish.


Other paleo pumpkin recipes:


paleo pumpkin bread
paleo pumpkin chocolate chip muffins


Friday, October 18, 2013

Sweet Potato Cottage Pie (Paleo Freezer Meal)

Cottage pie is one of my favorite comfort foods. It is also one of my go-to meals. Its pretty easy to make and I usually have the ingredients on hand.

Follow me on Instagram (@coreysuzanne) for more inspiration (and some cute kiddo pics too!)

When I did my Whole30, I was craving cottage pie and just had to figure out some way to replace the white potatoes in the classic Irish/English dish. I had seen a recipe for sweet potato cottage pie somewhere on Pinterest (follow me!) but it was made with sugary, cinnamon cream cheese. That was not an option. So, I came up with this recipe instead.

The mustard knocks the sweetness of the potatoes down a notch and gives this dish a great savory flavor. This is such a cozy dinner. If you use a cast iron skillet or a dutch oven and bake the sweet potatoes you can even get away with making this dish in one pot! Easy clean up!


I have made extra baked sweet potatoes one night and the next night made this cottage pie. Baked sweet potatoes peel extremely easily and  you don't have to reheat them because you are going to toss the whole thing in the oven away!

I am all about freezer meals. Its essential to have some meals made that I can toss in the oven when I don't have time or energy or focus to make anything else. I have had a hard time finding paleo friendly meals that work in the freezer. I am working on a list and would love to hear what you make for your hectic nights. This sweet potato cottage pie is fabulous as a freezer meal. It heats up perfectly!

Check out my stash of freezer meals! Perfect for crazy (or lazy) nights.
This recipe makes enough for a family of four. For my family of 2 adults and 2 kiddos I just split the recipe into two pans and have two meals made and ready to go. Usually I will make the full recipe and put half into an aluminum loaf pan and stick it in the freezer and serve the other half for dinner.

As always, I have listed the onion as optional because I just don't ever add onion to my cooking. I do usually add a bit of onion powder for flavor. Also, technically lima beans and peas are not paleo-approved. If you are affected by legumes don't add them. 


I really hope you enjoy this dish. I love it and I am really excited to share it with you! Please leave a comment and let me know what you think of the recipe. Feel free to share this recipe on your blog. This is an original recipe so, I just ask that you link back to my blog. Also, share it on Pinterest, Instagram (#domestic360), and Facebook.

xoxo,
Coco


Sweet Potato Cottage Pie

  • 1 pound ground beef (grass-fed) could use ground lamb for Shepherds Pie
  • 1 cup sliced carrots (or about 2 large carrots)
  • 1 cup sliced celery (or about 2 large stalks)
  • 1 cup frozen lima beans or peas (leave out for strictly paleo meal)
  • 1 tablespoon chopped garlic (or 2 large cloves)
  • 1/2 cup chopped yellow onion (optional)
  • 1 tablespoon extra virgin olive  oil
  • 1-2 tablespoons Worcestershire sauce
  • 2 teaspoons stake seasoning (optional)
  • 1 bay leaf
  • 1/2 cup water
  • salt and fresh ground black pepper to taste

  • 2 medium to large sweet potatoes, peeled and cut into 1" pieces or baked
  • 1/2 cup coconut milk
  • 2 tablespoons coarse ground horseradish mustard
  • salt and fresh ground black pepper to taste

Preheat oven to 350F.

In a large skillet (or dutch oven) set to medium-high heat, drizzle enough olive oil in the pan to lightly coat the bottom. Add the chopped garlic and onion. Saute until the garlic is fragrant and the onion is translucent. Add the ground beef and brown.

Add carrots, celery, Worcestershire sauce, stake seasoning, bay leaf, water, salt and pepper to the skillet. Cover and let simmer until the carrots and celery are cooked. 

Meanwhile, boil a salted pot of water and add the sweet potatoes. Boil until cooked through. (Alternatively: stab raw sweet potatoes with a fork all around. bake at 400F for 45 minutes to an hour or until tender. Peal when cool enough to handle.) Drain and return to the pot or a large mixing bowl. Mash the sweet potatoes and add coconut milk, mustard, salt and pepper.

Transfer the beef mixture to a casserole dish (or leave in the skillet if using cast iron or dutch oven). Spoon mashed sweet potatoes over the beef and smooth out to cover the beef.

Bake for 20 minutes or until the sweet potatoes become a little crusty.

FREEZER MEAL OPTION
Prepare as directed above, except transfer beef to an aluminum baking dish and top with sweet potatoes. Cover with tin-foil and label. Freeze for up to 6 months. To reheat: Preheat oven to 425F. Leave foil on and bake for 35-45 minutes. Remove foil and bake an additional 15-20 minutes or until heated through and sweet potatoes are a little crusty.

Sunday, July 28, 2013

My Whole30 Journey - Peach Blueberry Nutty Crisp


Peaches are one of great things about summer! They are one of natures sweetest candies. Juicy and sweet, ripe peaches are always on my Farmer's Market list this time of year.

The other day my mom went to the Farmer's Market on my behalf (kids were napping) and brought me a wonderful bag of juicy aromatic peach seconds. Seconds are the fruit that is just a little over ripe and maybe isn't too pretty, but that means that the fruit is even more flavorful and juicy sweet. Usually farmers will have these off to the side, but all you have to do is ask for them. This is a great way to get cheaper fruit for pies, jams, muffins, cakes, cobblers and crisps!


What goes well with peaches? Blueberries! Blueberries is one of these super-foods. They are packed with antioxidants (combat free-radicals which can attack cells), vitamins K and C, fiber, and magnesium. Just look it up, blueberries are awesome food for your body!

Most cobbler, pie and crisp recipes use some form of sweetener. This one doesn't. I am convinced that if you use wonderful, naturally sweet fruit, you don't need any extra sweeteners. Now, if you are using less than ripe peaches, you might want to add some honey/agave/brown sugar/coconut sugar/etc...

Peach Blueberry Nutty Crisp

4 peaches, sliced
1/2 cup fresh or frozen wild blueberries (raspberries or blackberries would work too)
1/2 teaspoon cinnamon
1/4 teaspoon almond extract (optional)
1/2 cup flaked coconut
1/2 cup roughly chopped pecans
1/2 cup sliced almonds
2 tablespoons coconut oil (melted)

Preheat the oven to 350 F.

Combine peaches, blueberries, and cinnamon in a small baking dish. Sprinkle almond extract on top of this mix.

Toss coconut, pecans, and almonds with coconut oil, spread on top of peach and blueberry mix.

Bake for 20 minutes, or until the nuts are lightly toasted. Serve warm with whipped coconut cream (see my post on coconut milks).


Friday, July 26, 2013

My Whole 30 Journey - Bacon-Wrapped Dates

The first time I had bacon-wrapped dates was at a potluck game night for our Bible study group. The couple who brought them was new to our group and I remember thinking, I want to be best friends with these people!

As the world knows, everything is better with bacon. Sandwiches, salads, chocolate, cookies, ice cream, and dates. Dates are INCREDIBLE with bacon. Practically from heaven. The naturally sweet and chewy dates get caramelized and are offset by the crunchy and salty bacon. Seriously, a flavor explosion in your mouth!

Some people stuff the dates with cheese or other wonderful foods before wrapping them with the bacon, but I can't bring myself to experiment with perfection.

I made these for J's one year Robot Birthday Party, doubled the recipe and they were gone. Since then I have made them for various parties, dinners, get-togethers, and just as a treat for my family. When I started the Whole30 and learned of the wonders of fat (rejoice, fat is good for you!), I was thrilled! I made a batch of these bacon-wrapped dates to snack on. As usual, between the hubs, J and I, they didn't last long.

These are really easy to put together, its just bacon and dates for goodness sake! Out of sheer laziness, I usually don't even use toothpicks. Be warned though, if you don't use toothpicks some of your dates will escape from the bacon while cooking.

Bacon-Wrapped Dates
(original recipe YUMSUGAR)

  • 1 16 oz. package of regular thickness bacon, cut into thirds (see note about bacon)
  • 1 8 oz. package of pitted dates
Preheat oven to 350 F. Position oven rack in the center position. Cover a cookie sheet with tin foil.

Wrap a piece of bacon around a date. Secure with a toothpick, or  make sure the bacon seam is placed facing downwards on the cookie sheet pressing firmly so it is less likely to unravel. Repeat until all the dates are wrapped in bacon.

Bake for 20-25 minutes until crisp. Let cool for 10-15 minutes for serving.

Makes 25-30 bacon wrapped dates.


Note About Bacon: Most packaged bacon is made with sugar. Check your labels. We get our pork and beef from my cousin's farm so we don't worry about how the animals are treated or what they are fed. There is an officially Whole30 Approved Bacon.

Thursday, July 25, 2013

Paleo BBQ Sauce

Summer = BBQ

Summer is such a great time for food. Grilling out on the deck with a beer and tons of friends and family around to just enjoy the season. That's the American dream, right? Its what all the commercials tell us we should be doing this time of year, and I am fine with that! I love me a good cook out and all the food that comes with it.

The problem is that most of the foods served at cook outs are not health-friendly, much less paleo or Whole30 approved. Among the mayo soaked pasta dishes crazy sweet deserts BBQ sauce is can be one of the biggest "no, no"s out there.  Its usually packed with sugar and preservatives.

The solution? Make your own!


It takes about a good full afternoon to make and can this sauce. It needs time to simmer so all the flavors can meld.

This BBQ sauce is to die for! My family is full of BBQ lovers. We are that family that would make a detour just because there was a local BBQ legend 20 miles up the road. Every Friday is unofficially BBQ Friday. Needless to say, we have tried a lot of different sauces. Mustard based, vinegar based, tomato based, smokey, sweet, spicy. From Maryland to Texas and everywhere in-between.

Needless to say we have some pretty refined BBQ taste buds. And this recipe was declared a home run! My brother told me to slap on a label and sell it. Its got a great smokey flavor and is slightly sweet, but not overwhelming. So far, I have served shredded chicken and ribs with this sauce.

I would like to experiment farther with this recipe and replace the applesauce with peach sauce or maybe chop up some roasted peaches, apricots or apples. Perhaps add some smoked peblano peppers or something spicier. I will let you know if I get around to messing with perfection.

This recipe produces quite a lot of sauce, enough for a good sized party with lots of leftovers. I ended up with 8 jars worth of sauce leftover after my big family dinner. I transferred the sauce to canning jars,submerged them in water and boiled for 45 minutes until the jars sealed themselves (the button on the lid sucked itself in).


Paleo BBQ Sauce
(adapted from The Domestic Man)

2 tbsp coconut oil
2 medium onions, minced
2 28oz cans whole tomatoes in juice
2 8oz cans tomato sauce
1 1/2 cups apple cider vinegar
1/2 cup apple sauce (or honey)
6 whole dates, chopped (or date molasses)
1/2 cup orange juice
2 tbsp paprika
2 tbsp chili powder
4 tsp hickory liquid smoke
4 tsp ground black pepper
2 tsp salt
1 tsp Worcestershire sauce (check your label, see note*)
1/4 cup horseradish mustard
1/2 tsp all spice
1 bay leaf


In a dutch oven, heat up the coconut oil on medium for a few minutes. Add the onion and saute until the onion becomes translucent, about five minutes.


Add the rest of the ingredients, and just as it starts to boil, set the heat to low. Simmer for two hours, using a potato masher to break up the tomatoes as they cook. After two hours, remove the bay leaf and blend the sauce in batches until it’s smooth. Return the now-smooth sauce to the dutch oven and simmer for another 30 minutes. Or, if you have an immersion blender, you can just blend it in the pot. If the sauce isn't thick enough, you can add some honey or molasses and cook it for another 30 minutes or so.
This sauce can absolutely be canned. To do so, submerge it in a hot water bath for 45 minutes, using this method from The Domestic Man. It should be good for a year after that point. After opening, I suggest finishing the sauce within a month.

*Note about Worcestershire sauce: I didn't realize Worcestershire sauce has soy sauce in it until after I made this sauce. Oops! If you have a soy allergy, make sure to read the label! The Original Worcestershire Sauce by Lea and Perrins doesn't have soy. It does have molasses and sugar, so its not Whole30 approved.

Wednesday, July 24, 2013

My Whole 30 Journey - Butternut Squash Coconut Curry Soup

I am one of those people who can eat soup any time of year for pretty much any occasion  I know there are people who don't eat soup in the hot weather of summer, but that's not me. So, when I found a lovely butternut squash at the store I knew I wanted to make some soup despite the 90 degree heat.. 

The sweet and nutty flavors of butternut squash taste so lovely with the spicy flavors of curry and the creaminess of coconut milk. Even J, who is 23 months, loved this soup. 

This recipe produces a pretty spicy soup. If you aren't into the spicy thing than just reduce the spices by half and taste it, if you want more spice you can always add it in later.


Butternut Squash Coconut Curry Soup
(loosely adapted from The Novice Chef)

Recipe Note: some brands of coconut milk solidifies in the can. Before opening, warm the coconut milk by submerging the can in hot water for 5 minutes. See my post on Coconut Milk Reviews for more information.

ingredients:
2.5 lb Butternut Squash (basically one large squash), deseeded, peeled and cut into 1” cubes
5 tablespoons olive oil, divided
¼ yellow onion, chopped (optional)
1 teaspoon cinnamon
1 teaspoon salt
2 teaspoon curry
1 teaspoon garam masala
½ teaspoon turmeric
½ teaspoon ground ginger
¼ teaspoon cumin
ground black pepper, to taste
1 cup coconut milk, full-fat
2 cups chicken or vegetable stock
cilantro, optional - for garnish

directions:
Preheat oven to 375°F. Line a baking sheet with foil. Toss the squash with 3 tablespoons olive oil and spices and spread out on the baking sheet in a single layer. Roast the squash for 45-55 minutes, until tender when poked with a fork.
Heat up 2 tablespoons olive oil in the bottom of a soup pot. Add onion and sauté until onion is translucent, about 5 minutes.  Add the roasted squash and stir together.

Add stock and coconut milk and stir to combine. Use an immersion blender or a regular blender to blend up the soup until smooth.
Serve hot with a little extra drizzle of coconut milk and cilantro.
If preparing ahead, store in an airtight container in the fridge for up to a week. Then reheat in a non-stick pan on the stove.

Tuesday, July 23, 2013

My Whole 30 Journey - Coconut Milk Review

As it turns out not all coconut milk is created equal.

I have yet to encounter a can of coconut milk that I didn't like. Its thick and creamy and has a slight hint of coconut flavor. Its great in coffee and on fruit and in baked goods or curries.

However, different brands of coconut milk are better for different purposes. I am going to let you in on the coconut milk secrets that I have learned while on this Whole 30 Journey. I should say that I haven't tried every brand out there, but of the ones that I have tried these are my favorite.

Make sure to read your labels! This is one of the most important things to do while on the Whole 30. Manufactures love to sneak sugar and other yucky ingredients into their products. Most of the coconut milk that is sold in boxes or in the dairy section has either sugar, soy, carrageenan, or other non-Whole-30 friendly ingredients. I have found a few brands that I like and I and sticking to them.


Best in Coffee (and other drinks)
I love 365 Everyday Value Light Coconut Milk. Its organic, score! And it tastes great. The thing with putting coconut milk in your coffee is that it is very thick and gets thicker when chilled. As a result it can clump up in iced coffee. Not an issue when you are drinking hot coffee because the heat from the coffee melts the fats in the coconut milk, but in iced coffee it presents a bit of an unpleasant drinking experience. This is why I use LIGHT coconut milk in my iced coffee. Its thinner than regular coconut milk without being watery and doesn't do the weird clumpy thing that full fat milk does. This brand also made CookingLight's Our Favorite Store-Brand Products list.

You can buy 365 Everyday Value Light Coconut Milk at Whole Foods Markets.

Best on Fruit and Cooked into Recipes (for baking and other dishes)

When I was a kid one of our favorite summertime deserts was fresh fruit and cold cream. We would toss some fresh berries or chopped peaches in a bowl and pour on the half and half. No sugar needed! It was an awesome treat. To this day that is one of my favorite flavors, and coconut milk just takes it to the next level. Thick, creamy and slightly sweet, coconut milk is the perfect topping for fresh fruit. Sprinkle on some toasted coconut shreds and you have a desert fit for Mount Olympus!

Again I love me some 365 Everyday Value Coconut Milk. The reason I love this particular brand of full-fat coconut milk is because it doesn't separate and solidify in cold temperatures. Most full-fat coconut milks will separate, the fatty part will rise to the top and the denser liquid will settle at the bottom. This is a good thing when you are trying to make whipped cream, but not so good when you want to just use the milk to bake with. I like that I can pop open a can of this brand of coconut milk and I don't have to use the whole thing. I can just stick it in the fridge and come back for more at any point without having to remix the water and fats.

You can buy 365 Everyday Value Coconut Milk at Whole Foods Markets.

Best Whipped Cream

Whipped coconut cream is to die for. I mean seriously. Its creamy, light, slightly sweet and slightly coconutty (that is so a word). All you have to do to make coconut whipped cream is take a can of full-fat coconut milk and stick it in the fridge for a few hours or overnight. Then when you are ready to make your whipped cream, remove the can from the fridge without shaking or jostling it too much. Open the can and scoop out the thick white coconut fat and cream that has risen to the top. Make sure you don't get the clear liquid that is sitting at the bottom of the can. Now just whip up the white stuff until it is the consistency you are looking for. There you go! Coconut whipped cream. Dairy free, vegan, and healthy! Use it on fruit, baked goods, or one of those awesome looking watermelon "cakes."

I really like Chaokoh brand full-fat coconut milk for whipped cream. Truth is, sometimes I don't even whipped it at all. Its so thick and wonderful that I have been known to just scoop it onto some fruit (try grilled peaches!) and go to town. 

You can find Chaokoh brand coconut milk in the Asian section of your grocery store.


What do you use coconut milk for? 
Do you have a favorite brand?
Leave a comment and let me know!

XOXO,
Coco