This blog is no longer hosted on this site. Check out the new and improved Domestic360 at domestic360life.com for even more DIYs, recipes, and fashion tips!
Showing posts with label personalized. Show all posts

Thursday, November 1, 2012

The Savannah Bag

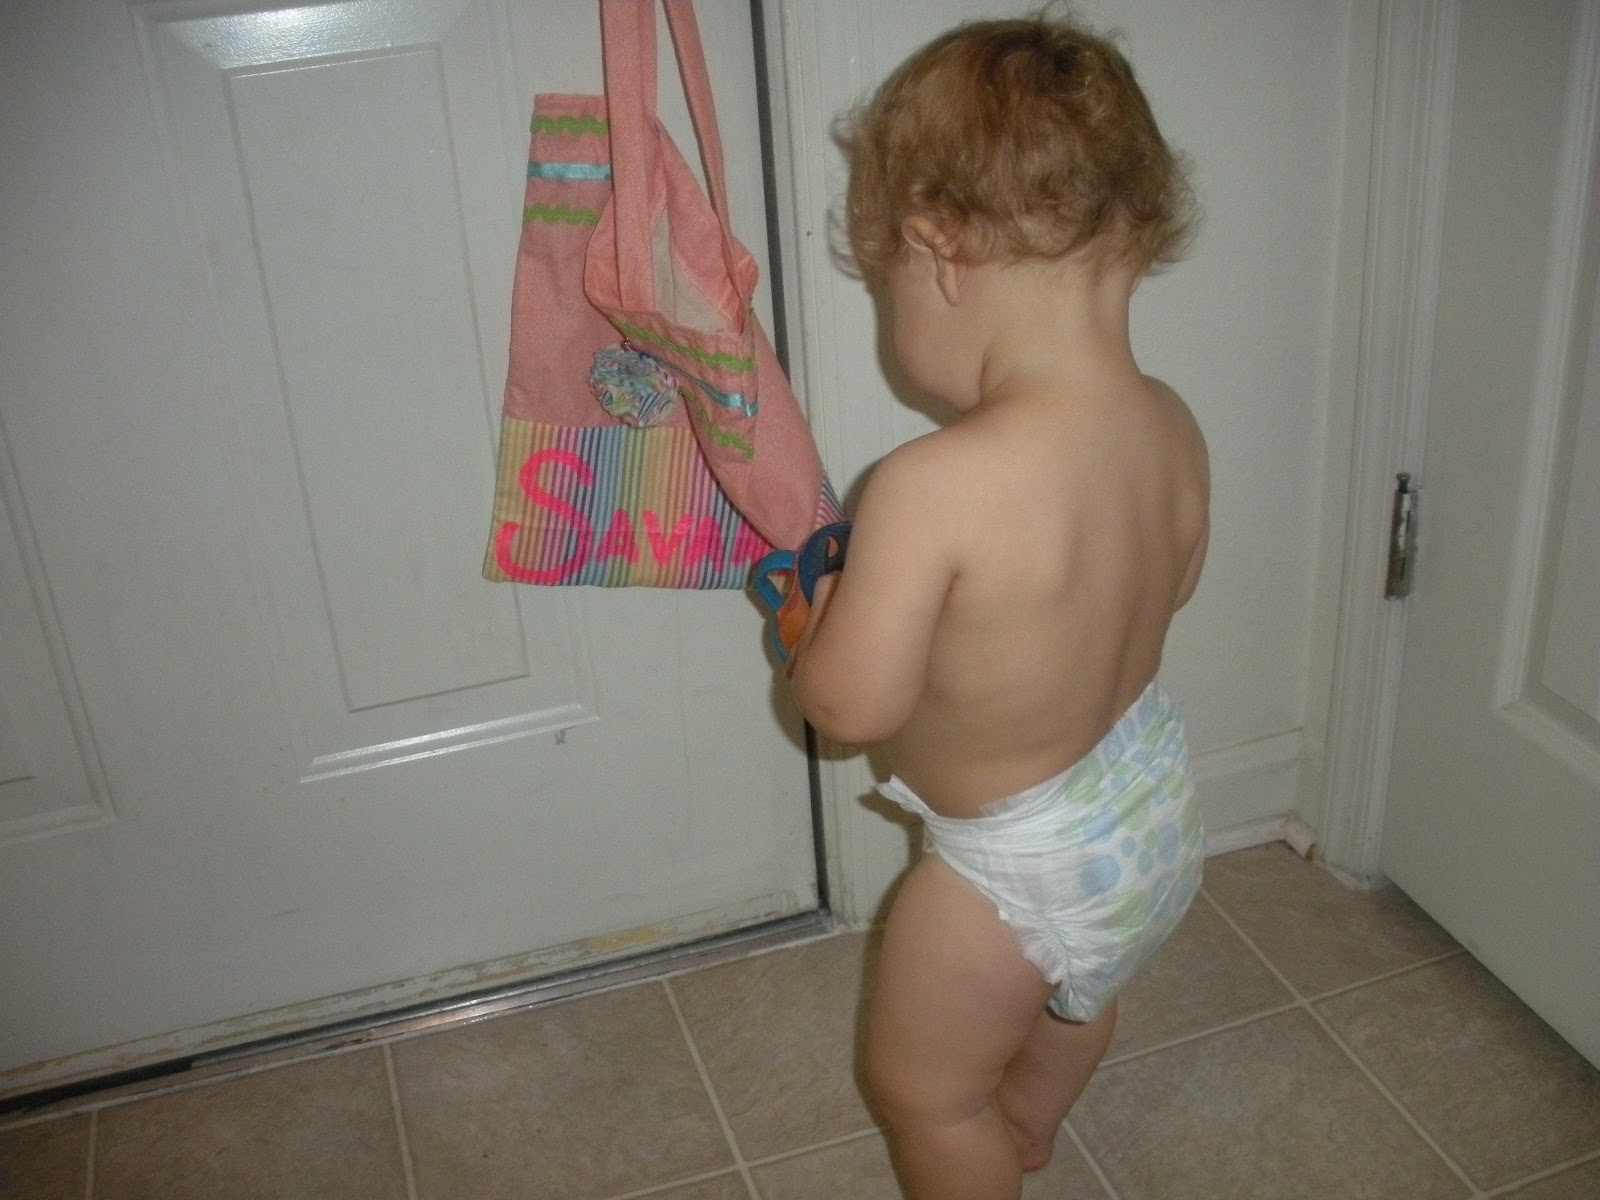
My wonderful niece, Savannah, just started preschool and her mom asked me to make her a bag to put her folders and papers into. I had such a good time picking out the fun fabrics and ribbons. 


The only problem I had while making this bag is that my niece has such a long name that it was had to make it fit. The original plan was to write her name with fabric applique letters diagonally across the bag... Yeah, there was no way that was going to happen. So, I ended up adding a strip of fabric around the bottom of the bag and just painting the letters on. I like the way it turned out.


I used the tutorial  for The Twenty Minute Tote from Molly's Sketchbook over at the Purl Bee. (P.S. I love the Purl Bee Blog, check them out for some great inspiration!) I modified the pattern a little, added some ribbons to the top of the bag, added the fabric stripe to the bottom, and made the straps out of fabric instead of using webbing. Its a super easy and quick pattern, and the tutorial is really clear and simple to follow.


I also made a little pompom flower that can be pinned to the bag or be a hair clip! Just cut out a bunch of little circles of fabric. Fold them into quarters, stick a threaded needle through the corner of each folder circle and bunch them all up at the end of the thread. Loop the needle through the whole bunch a few times to secure and then knot. Add a small circle of felt to the back of  the pompom, stitch a safety pin to the felt and hot glue on a small hair clip. That's it! Easy!
(Jude didn't like having a flower in his hair)


Monday, October 8, 2012

Sanity Tote Bag (Tutorial)

One of my very good friends from college recently made the very brave move to the Big Apple. (Check out her blog at emyannie.wordpress.com ). Annie and I were the only Theatre Production majors in our class at school, therefore we were each others' biggest fan and biggest competition (though there wasn't much competition due to the fact that we were such good friends). We were even told by our professors that we should be friends and lean on each other, we took this advice to heart. Annie and I quickly adopted the nickname "Sanity" and started using it to address each other.


When I heard that Annie was moving to New York (just picking up and going!) I was jealous, proud, excited, impressed, and excited. She would now be only three hours away instead of 24. She is living the dream (living on couches and eating Ramen Noodles and peanut-butter) in the City that Never Sleeps.

I wanted to give her something that would be useful but also comforting. Something that she could use in her daily life of job searching and Subway riding. A tote bag seemed the perfect option.


You will have to forgive me. I don't have a picture for every step because I got rushed trying to finish the bag before Annie arrived so I forgot to take pictures. Hopefully the instructions will be clear enough, if not just send me a message and I will help you though the tutorial.


Sanity Tote Bag (Tutorial)

What you will need:

  • A bunch of different complimenting cotton fabrics for the stripes. Fat quarters are perfect for this project! 
  • 1/2 lining fabric (don't get the silky fabric used for lining clothing, you just want a quilting cotton fabric)
  • 1/2 quilting cotton fabric for the main body of the bag
  • 1 yard medium weight fusible interfacing
  • 40 inches of 1/2" bias tape (or make our own with this tutorial)
  • The Usual Stuff (sewing machine, hand sewing needle, fabric scissors, straight pins, matching thread, rotary cutter and mat, square ruler, etc...)

Cut the strips for the stripes. This is the same technique that I used to make my Patchwork Rice Bag. Cut the complimenting cottons into strips of 1 ½”, 2” and 3”. The easiest way to do this is with a rotary cutter. Fold your fat quarters in half, making sure to line up all the edges. Then stack one on top of the other, again making sure to line up all the edges. Check out this tutorial from Purl Bee for more info on cutting with a rotary cutter.

Once you have cut all the strips you will need, around 13-20 total, mix them up in a pile or a small bag. This way you will get a random pattern. Stitch your strips together, using a ¼” seam allowance.


Once you have all of the strips sewn together press all the seams to one side. This is now going to be referred to as the “patchwork fabric.”

Cutting:
Outside pockets (the orange fabric) - 10"x18" cut 2
Stripes - 7"x18" (cut on a 45 degree angle) cut 2
Inside pocket - 12.5"x13"
Inside lining - 18"x15" cut 2
Outside lining - 8"x18" cut 2
Straps - 3"x33" cut 2
Interfacing - 18"x15" cut 2

Stitching It Up!
Use a 1/2" seam allowance unless otherwise noted.

Stitch the stripes to the outside lining along the 18" side. Iron the fusible interfacing onto this piece of the bag, just follow the instructions that came with the interfacing.

Attach the bias tape to the 18" side of the outside pocket. Hand embroider "Sanity" or your name. Check out this video on how to stitch a back stitch. Don't worry if its not perfect embroidery that's the charm of this bag! Using chalk or another fabric marking device, draw a line down the middle of the outside pocket piece. It should be dead center, so 9" from each side. This will be your stitch line a little later.

Lay the outside pocket on top of the outside lining/stripes piece. They should line up at the bottom and the outside pocket should overlap the stripes so you can't see the outside lining. Using a basting stitch, stitch around the three outside edges of the outside pocket. Stitch down the middle on the stitch line you drew. Make sure to back tack with this one.

With right sides together stitch the two outside pieces together around three sides. Trim the corners, turn right sides out, and press.

Fold the inside pocket in half so that it measures 12.5" x 6.5". Stitch around the non-folded edges, leaving a area for turning. Trim the corners. Turn the pocket right side out and press, tucking in the raw edges. Using chalk, draw lines for where you will stitch later on the pocket. These pockets will be 4.5" wide (for a cell phone), 5.5" wide (for a small notebook), and two 1" wide sections (for pens and pencils).
Pin this pocket to one the inside lining pieces. It should be about 3.5" from the top of the piece (the 18" part) and 3" from the sides. The folded edge should be the top and the open space you left for turning should be pined closed. Top-stitch around three sides leaving the top open. Now stitch over the lines that you drew for the pockets.
With right sides together stitch the two lining pieces together around three sides. Trim the corners, leave it inside out and press.

Fold the 3"x33" fabric for the straps in half long ways. Stitch up the long sides of the strips creating three tubes. Trim the seams to 1/4". Pin a safety pin to one end of one of the tubes, only pin through one layer of fabric. Feed the safety pin back through the tube to turn it right-side out. Just keep scrunching up the fabric around the pin until the pin comes out the other end of the tube, then keep pulling the pin through until all the tube is right-side out. (These pictures are from my Beach and Imagination Tent tutorial)


Press the tube. Fold the tube in half long ways and press again. Pin if you want to, I didn't because my fabric was staying folded pretty well. Stitch right on the edge of the fabric to keep the edges together, hopefully the photo will illustrate what I mean. Do the same thing for the other strap.

Pin the straps to the outside fabric piece. The straps should be 4.5" from each side. The straps' raw edges should be in line with the raw edge of the top of the bag. Baste these in place.

With right sides together, put the lining fabric inside the outside fabric. The straps should be on the inside of this sandwich too. Stitch around the top of the bag leaving a 3" hole for turning. Turn the whole thing right-sides out and press (making sure to press the raw edges you left for turning inside so they are no longer hanging out).  Top stitch around the top making sure to back stitch and the beginning and end. 


That's it! Hope you get creative and make one of these bags for yourself or for a friend. It would make a great Christmas gift!


Sunday, August 26, 2012

Kiwi Coasters (Tutorial and Pattern!)

I believe inspiration comes from anywhere and everywhere. 

I love Molly's Sketchbook from the brilliance of The Purl Bee.

I love the little projects. They are so sweet and often have just enough quirk to make me feel funky. I am all over little kitschy projects that make my home mine. These kiwi coasters were inspired by the Apple and Citrus Coasters from Molly's Sketchbook.

My Kiwi Coasters are a really quick and simple project to add some fun to your  day to day life. I made six coasters, but you can make as many or as few as you like. Each coaster takes about 30 mins from start to finish. So, try wipping up some great little Kiwis for your drinks to rest on.


Kiwi Coasters
What you will need:
(this tutorial is for 6 coasters)

  • 3 sheets of brown felt
  • 2 sheets of green felt
  • Lime green embroidery floss
  • Kelley green embroidery floss
  • Black embroidery floss
  • White embroidery floss
  • Brown embroidery floss
  • The Usual Stuff (hand embroidery needle, fabric scissors, paper scissors, straight pins, etc...)

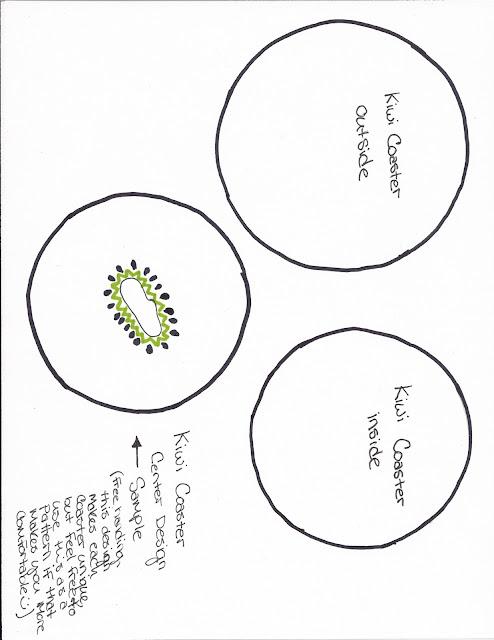
Cut out the circles according to the pattern (scroll down to the bottom of the post to find the pattern). For each coaster you will need two larger brown circles and one smaller green circle.

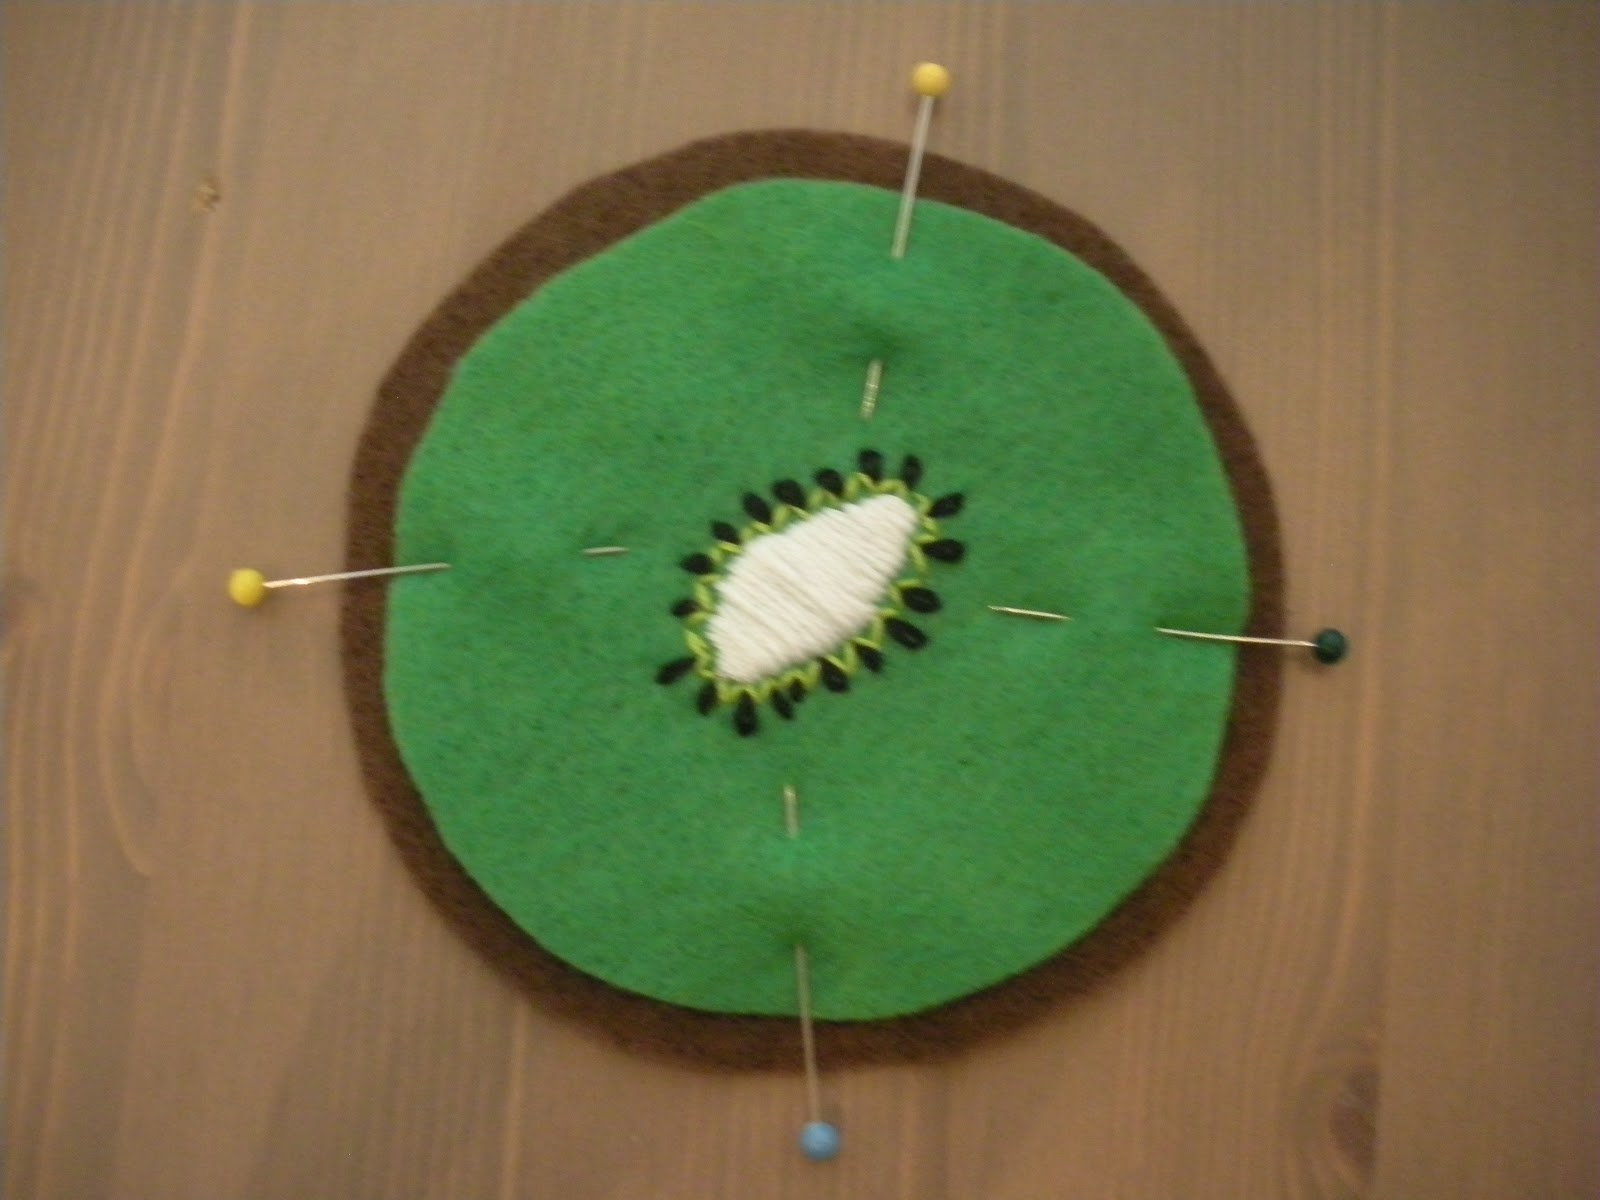
For the center of the kiwi use white embroidery floss and the satin stitch (check out this tutorial). Stitch a organic, kidney bean kinda shape in the middle of your green circle, I have drawn a guide for this on the pattern, but I think it looks great when all the centers are a little different. So, don't be scared to free-hand this!

With the lime green floss stitch little "V" shapes all around the center of the kiwi. Again, free-handing this gives it a great organic feel! 

Using the lazy daisy (tutorial) stitch little "seeds" in each of the V's you just created. 

Once your embroidery is all done, pin the green circle on top of one of the brown circles and pin in place.

Using the running stitch (tutorial), stitch around the perimeter of the green circle.

Pin the brown and green circles on top of the remaining brown circle. Starting from the inside stitch around the perimeter using the running stitch (tutorial).


Trim the edges so the brown circles are even. 


Here is the pattern. Print it out on a full sheet of paper.


Tuesday, July 3, 2012

Audrey Sunglasses Case (Tutorial)


I have needed a sunglasses case for years. I generally just toss my sunglasses in my purse or beach bag and they end up getting all scratched and smudgy. And who else to grace the front of a sunglasses case than the elegant lady who wore the shades so very very well?

Here is my tutorial for the Audrey Sunglasses Case.
Enjoy.
Create.
Share.
Audrey Sunglasses Case Tutorial
What you will need:
For the case:
  • 9"x9" square of quilting cotton ("grey fabric")
  • 9"x9" square  of quilting cotton ("multi fabric")
  • 9"x9" square  thin cotton quilting batting ("batting")
  • 1" squares of male and female Velcro
  • Drinking glass or something with a round with a  2 3/4" diameter (doesn't have to be exactly 2 3/4" diameter, that's just the size I used) 
  • The Usual Stuff (sewing machine, hand sewing needle, fabric scissors, paper scissors, straight pins, matching thread, rotary cutter and mat, square ruler, etc...)


Wash and press all fabric before using (just in case it shrinks)


Cut out pieces according to the measurements, or use a rotary cutter and square ruler. (Check out this tutorial for using a rotary cutter). 


Use the drinking glass to draw a half circle in two opposing corners, about 1/2" from the edge of the fabric. This is one of those cases where you should use tailors chalk, but I found that using a pencil was much easier because I could get much closer to the edge of the glass.


Layer the grey and multi fabrics (right sides together and matching up the edges), layer the cotton batting on top of this stack. Pin.


Stitch 1/2" seam alowance around the edge and along the rounded line you drew from the drinking glass. Leave a opening for turning on the opposite edge from the curved edges and in the middle of the squares.


Trim seams to about 1/8" all the way around except the unstitched opening for turning, leave this alone.


Turn the whole thing right sides out. Press very well, making sure to press the raw opening edges to the inside.

Pin the Velcro squares 1/2" from the top of the pouch (the side with the curved edges) and roughly 3" apart. Stitch around the edges of the Velcro and in an X across the square.


This is when you should stencil on your design, skip down to the bottom of the tutorial to find instructions of making an painting a stencil.


Fold the case in half with the multi fabric on the inside. Pin along the outside edge up to where the curve starts. Make sure the raw edges of the opening are not poking out.

Stitch right along the edge of the case, starting at the bottom of the curved edge and going along to the folded edge. 


Audrey Stencil Tutorial
What you will need:
For the stencil:
  • Printer paper
  • Transparency film
  • Fine-tip marker
  • Xacto knife and blades (always use a new blade for every new project you start)
  • Self healing cutting mat
  • Paper Scissors
  • Masking tape
  • Fabric paint
  • Paint sponge

Print out the image onto regular printer paper. The image should measure roughly 4 1/2" x 4" when printed. (I printed mine onto scrap paper, that's why it has writing and other things in the background. Go green :).

Trace over the image with a marker to make sure you know where you are supposed to be cutting. 

Cut out the image and tape it to the cutting mat.

Tape a sheet of transparency film over the image. Make sure there is plenty of room around the image. I usually leave at least 3" around the image that I will be making into a stencil. That way you can be sure that there is no issues when painting. 

Use a sharp Xacto knife, cut out the area of the stencil that you colored with the marker. Continue cutting until the whole image has been cut out.


Test the stencil by placing it over a piece of scrap paper. Make sure not to brush the paint onto the stencil. Dabbing in and up and down motion is the best method. 


If you need to this is the time to make changes or slight adjustments to your stencil.


Tape your stencil in place on the case. Dab on the paint in an up and down motion. 


Remove the stencil and save for use on future projects.


A note on stencil images:
Find an image that you want to use, I chose this really great Audrey Hepburn image because it is simple and pretty much ready to go. If you want to find a different image try Googling things like "flower stencil," or "bird stencil," also using the terms "vector" or "clip art" can result in some really great stencil-ready images.

If you find an image that is not already a stencil then you will have a little more work ahead of you. It is easiest to just use images that are supposed to be stencils. If you fall in love with an image that is not already a stencil image then try to use something that is in black and white with clear lines. Remember that free floating doesn't work with stencils, there have to be connecting piece, so you may have to add these connectors.


I hope you are inspired to make your own sunglasses case. 
Let me know what you think of mine.
If you make one please share your thoughts on the tutorial and send me some pictures of your project.

Xoxo and Happy Stitching!
Corey