This blog is no longer hosted on this site. Check out the new and improved Domestic360 at domestic360life.com for even more DIYs, recipes, and fashion tips!
Showing posts with label coffee. Show all posts

Saturday, December 1, 2012

Doughnut Coffee Cozy (Tutorial and Pattern)


Who doesn't like a good jimmy (or a sprinkle depending on where you're from)? 
Especially when it is on top of a fried piece of dough covered in frosting? 
And what better complement to a lovely doughnut than a big cup of steaming hot coffee?


This is one of those tutorials that I started out taking pictures for, and for one reason or another (usually my camera's batter needed to be charged and I didn't want to wait) I only got a few process pics. Good thing this isn't a hard pattern to follow. Pretty much, after you get the sprinkles stitched on the rest of the cozy goes together rather quickly. 

I suggest popping in a good (or cheesy) Christmas movie and making up one of these cute cozies as a great stocking stuffer. Or add it to a coffee lovers gift basket (toss in some chocolate covered espresso beans, a travel mug, and a gift card to their fave coffee joint).


Doughnut Coffee Cozy

What you will need:

  • tan felt (one sheet, 9”x12” OR ⅛ yard)
  • light pink felt (one sheet, 9”x12” OR ⅛ yard) (You could use brown felt for chocolate frosting or even blue for blueberry, get creative!)
  • light blue felt (one sheet, 9”x12” OR ⅛ yard)
  • thin quilting batting (a small amount
  • tan embroidery floss
  • light pink embroidery floss
  • sprinkle-color embroidery floss (aqua, lime green, white, yellow, purple, and pink)
  • thin white elastic cording (about 4" of 2mm)
  • One ¾” button
  • Matching thread (light blue)
  • The usual stuff (sewing machine, hand sewing needle, fabric scissors, paper scissors, straight pins, pencil, paper, tape, etc...)

Cut out two pieces of light blue felt according to the pattern. Fold one sheet of light blue felt in half long ways and pin the pattern in place. Using very sharp fabric scissors cut around the pattern. Cut out the doughnut pattern from the tan felt, you will need two doughnut pieces. Cut out the batting and the frosting using the appropriate pattern pieces.

Pin the frosting in place on one piece of the tan doughnut. Using a backstitch embroidery stitch (check out this video), stitch around the outside and inside edges of the frosting. You want to follow the curves and stitch pretty close to the edge. 

Now its time to make those sweet little sprinkles! This is so easy and there is really no technique, its just random. All you do is make small (various sizes of small looks really great) stitches in different colors all over the frosting. I used one color at a time and just filled in wherever I felt like there needed to be a sprinkle. The back of this piece ends up looking like a mess of colorful threads, but the back doesn't matter :)


I also added sprinkles to the cozy its self. Use the same method of random stitches all over one of the light blue cozy pieces.

    Layer the two cozy pieces of felt (make sure the sprinkle side is facing out) on top of each other making sure to match up the edges and corners. Fold the elastic in half and pin inside the felt sandwich according to the elastic placement marking on the pattern. Pin the rest of the sandwich so that it doesn’t move while sewing. Using the sewing machine, stitch around the perimeter of the felt, ⅛” from the edge; making sure to back-stitch at the beginning and the end.


      Sew the button onto the cozy, see the button placement marking on the pattern, going through both layers of felt.

      Sandwich the batting piece between the plain doughnut piece and the frosting doughnut piece. Center this sandwich on the cozy and pin in place. Using the backstitch and the tan embroidery floss, stitch around the inside edge (where the hole is) of the doughnut, and then stitch around the outside edge. Make sure you are stitching through both doughnut layers and both cozy layers. Where the doughnut hang off the cozy, just keep stitching as if it were through all four layers.


      Thats it! I hope you get crafting this holiday season! 
      Get your craft on and make some doughnut cozies to slip in those stockings.
      If you make one of these darling cozies, please let me know! I would love to see how yours turns out.
      Leave a comment here or check out the Facebook page:

      XOXO,
      Coco

      PATTERN:
      (Print out on a regular sheet of printer paper. I drew the pattern on notebook paper because we were out of printer paper, but if you print it on regular paper the proportions  will be just right.)


      Sunday, August 26, 2012

      Kiwi Coasters (Tutorial and Pattern!)

      I believe inspiration comes from anywhere and everywhere. 

      I love Molly's Sketchbook from the brilliance of The Purl Bee.

      I love the little projects. They are so sweet and often have just enough quirk to make me feel funky. I am all over little kitschy projects that make my home mine. These kiwi coasters were inspired by the Apple and Citrus Coasters from Molly's Sketchbook.

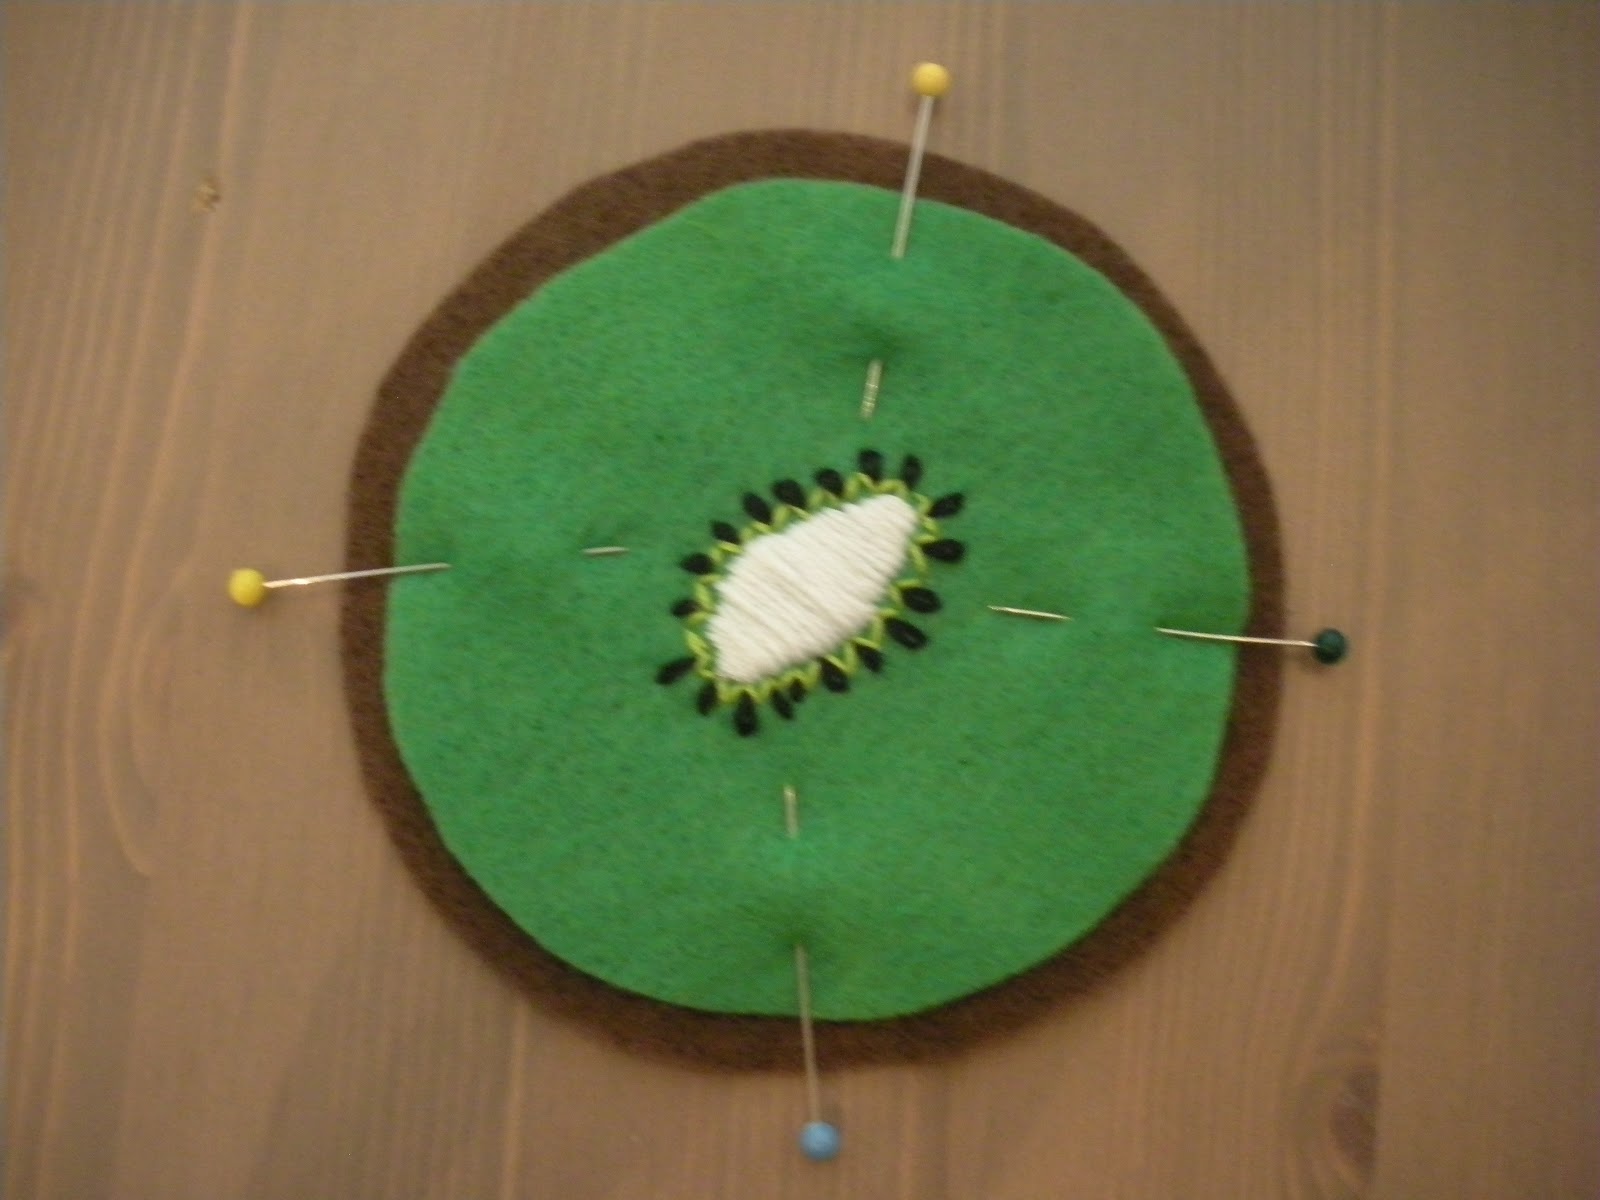
      My Kiwi Coasters are a really quick and simple project to add some fun to your  day to day life. I made six coasters, but you can make as many or as few as you like. Each coaster takes about 30 mins from start to finish. So, try wipping up some great little Kiwis for your drinks to rest on.


      Kiwi Coasters
      What you will need:
      (this tutorial is for 6 coasters)

      • 3 sheets of brown felt
      • 2 sheets of green felt
      • Lime green embroidery floss
      • Kelley green embroidery floss
      • Black embroidery floss
      • White embroidery floss
      • Brown embroidery floss
      • The Usual Stuff (hand embroidery needle, fabric scissors, paper scissors, straight pins, etc...)

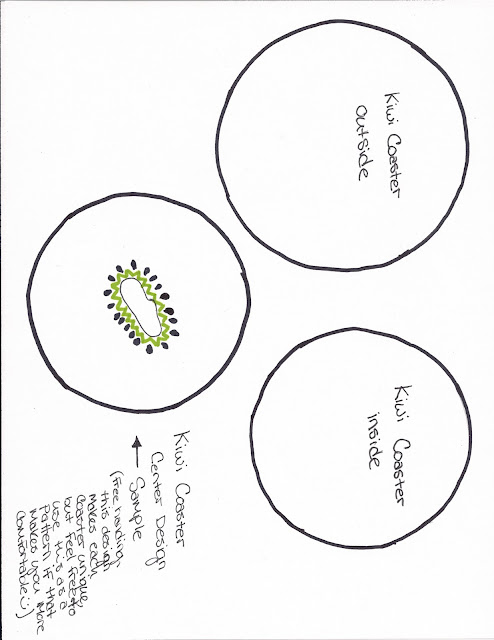
      Cut out the circles according to the pattern (scroll down to the bottom of the post to find the pattern). For each coaster you will need two larger brown circles and one smaller green circle.

      For the center of the kiwi use white embroidery floss and the satin stitch (check out this tutorial). Stitch a organic, kidney bean kinda shape in the middle of your green circle, I have drawn a guide for this on the pattern, but I think it looks great when all the centers are a little different. So, don't be scared to free-hand this!

      With the lime green floss stitch little "V" shapes all around the center of the kiwi. Again, free-handing this gives it a great organic feel! 

      Using the lazy daisy (tutorial) stitch little "seeds" in each of the V's you just created. 

      Once your embroidery is all done, pin the green circle on top of one of the brown circles and pin in place.

      Using the running stitch (tutorial), stitch around the perimeter of the green circle.

      Pin the brown and green circles on top of the remaining brown circle. Starting from the inside stitch around the perimeter using the running stitch (tutorial).


      Trim the edges so the brown circles are even. 


      Here is the pattern. Print it out on a full sheet of paper.


      Wednesday, May 9, 2012

      Rocket Ship Coffee Cozy Pattern and Tutorial


      Here is the pattern and tutorial for the Rocket Ship Cozy
      I hope you enjoy making your very own rocket ship! Please comment and tell me about what you are making, I would love to see pictures and hear your stories.


      • What you need:
        • One sheet of felt 9”x12” OR ⅛ yard of felt (I used navy)
        • One sheet of felt 9”x12” OR ⅛ yard of felt (I used mustard yellow)
        • One sheet of felt 9”x12” OR ⅛ yard of felt (I used grey)
        • Scraps of felt for the flames, windows, legs, and tip (I used yellow, orange, light blue, blue, and hot pink)
        • Small amount of thin cotton quilt batting
        • 4” of cord 2mm cord elastic
        • One ¾” button
        • Matching thread
        • Contrasting embroidery thread
        • Fabric paint (I used white and glow in the dark)
        • One sheet transparency film (used for old-school over-head projectors)
      • Cut out two pieces of felt using the EXTRA WIDE - FELT. To do this, layer the two sheets of felt (the navy and mustard); pin the pattern in place, and cut out using very sharp fabric scissors.
      • Cut out the constellations stencil. Lay the sheet of transparency film, on top of the stencil pattern, use a permanent marker to trace the stencil pattern onto the film, including the outside edge of the cozy shape. Use a mini hole punch and an exacto knife to cut out the pattern.
      • Tape the piece of navy felt to a piece of wax paper. Tape the constellations stencil on top of that. Using a sponge, sponge white and glow in the dark fabric paint onto the cozy. Let dry overnight. Test glow by holding the felt piece under a light for about 30 seconds and then turning off the lights. If it doesn’t glow enough for your taste add more paint and let dry overnight.
      • Layer the two cozy pieces of felt (the navy and the mustard) on top of each other making sure to match up the edges and corners. Fold the elastic in half and pin inside the felt sandwich according to the elastic placement marking on the pattern. Pin the rest of the sandwich so that it doesn’t move while sewing.
      • Using the sewing machine, stitch around the perimeter of the felt, ⅛” from the edge; making sure to back-stitch at the beginning and the end.
      • Sew the button onto the cozy, see the button placement marking on the pattern, going through both layers of felt.
      • Cut out the rest of the shapes, following the patterns. Grey for the rocket body; light blue for the outer windows; blue for the inner windows; hot pink for the rocket tip and legs; mustard yellow for the small flame; orange for the large flame. Cut the cotton quilt batting.
      • Stitch the light blue outer windows into place on one piece of the grey rocket body. Stitch the inner window piece in place on top of the light blue outer window pieces. Stitch the small flame onto the large flame.
      • Sandwich the quilt batting in between the two grey rocket pieces of felt, pin. Place the rocket legs and the flame in between the two rocket pieces, pin. Stitch around the outer edge of the rocket making sure to stitch through the legs and flame. Place the rocket tip in place (there will be some felt that hangs over the edge), stitch in place. Trim the extra felt from the tip of the rocket.
      • Stitch the rocket and the flame in place on the cozy, matching up the stitches you made when stitching the rocket together. The legs should not be stitched down.
      • Wrap the cozy around your favorite beverage and take your morning to the moon!

      Here are the patterns. Print them out on a full sheet of paper.


      Monday, May 7, 2012

      Rocket Ship Cozy

      Her is the mystery project I have been working on!
      Did anyone guess it was a rocket ship cozy? Nope, no one guessed. I got some pretty interesting guesses though, such as Space Camp outfits, and star painting. I am starting to think making Space Camp outfits might be a good idea. What kid didn't want to go to Space Camp? 

      Here is what I really made, its a... ROCKET SHIP coffee cozy!
      3...2...1... BLAST OFF!!!


      How cute is this? 
      The stars even glow in the dark, but the pictures of the glowing didn't turn out too well.
      Check out this cozy on my Etsy shopRocket Ship Cozy

      Check back here in a few days for the tutorial so you can make your own awesome Rocket Ship Cozy!

      Thursday, February 2, 2012

      KISS ME Conversation Heart Coffee Cozy TUTORIAL

      Here is the tutorial for our super cute Conversation Heart Coffee Cozy. Its pretty easy, so take an afternoon and make one of these sweet cozies for your bestie or your dearest love.


      • What you need:
        • One sheet of felt 9”x12” OR ⅛ yard of felt WHITE
        • One sheet of felt 9”x12” OR ⅛ yard of felt PINK
        • Thin cotton quilt batting
        • Aqua blue embroidery floss
        • Light pink embroidery floss
        • 4” of cord 2mm cord elastic
        • One ¾” button
        • Pink machine thread
        • Washable fabric glue
        • Scrap paper
        • *NOTE: you can use whatever color combination you like, check out a box of Conversation Hearts for inspiration*


      • Cut out two pieces of felt using the BASIC PATTERN - FELT. To do this, fold the sheet of white felt in half long ways; pin the pattern in place, and cut out using very sharp fabric scissors. Cut out two hearts from the pink felt. To do this, fold the sheet of pink felt so that the HEART PATTERN - FELT fits when placed on the folded edge. Cut one heart out of the cotton batting using the HEART PATTERN - BATTING, using the same technique.


      • Sandwich the batting in between the two hearts and pin. Sketch out your saying on a piece of scrap paper cut into the the same size and shape of the felt hearts. Transfer the letters onto one of the cozy pieces with tailors chalk.
      • Using the back stitch embroidery stitch (see this video for instructions), stitch your letters through all layers of your heart sandwich with the aqua blue embroidery floss. Start with the middle letters (I and S) and work your way out. This will insure that your saying is centered.


      • Using the running embroidery stitch (see this video for instructions) to stitch around the outside edge of the hearts with the light pink embroidery floss.


      • Layer the two pieces of felt on top of each other making sure to match up the edges and corners. Fold the elastic in half and pin inside the felt sandwich according to the elastic placement marking on the pattern. Pin the rest of the sandwich so that it doesn’t move while sewing.


      • Using the sewing machine and the pink machine thread, stitch around the perimeter of the felt, using the edge of the presser foot on the edge of the felt as a guide. Before you get to the place that you started the stitching, sink the needle into the felt and turn to make another row of stitching. Continue this until you have completed the swirl pattern on the cozy.


      • Fold the cozy in half and mark the center with two pins. Apply fabric glue to the back of the heart; taking care to avoid the sections of the heart that won’t be touching the cozy and the edges of the heart. Place the heart on the cozy lining up the points of the heart with the center pins. Sandwich between heavy books and let dry.


      • Optional: Restitch the edge of the heart along the same line as the light pink running stitch, this time going through the cozy as well as the heart when possible.
      • Sew the button onto the cozy, see the button placement marking on the pattern, going through both layers of felt.


      Now go out and use your new creation!


      Here are the patterns. Print them out on a full sheet of paper.


      Conversation Heart Coffee Cozy

      I don't know about you, but holidays always seem to creep up on me and I'm never ready. Especially Valentine's Day. Maybe because just as we are getting over the Thanksgiving, Christmas, New Years thing we are slapped with this "Prove Your Love" Holiday.

      Now, to be fair my husband and I have never celebrated Valentines Day. When we were little Ryan asked my cousin to be his Valentine and she turned him down for the new guy in school, hence the reason Ryan doesn't like Valentines Day. And I don't like the holiday because I wanted him to ask me and not my cousin. Guess I got the last laugh.

      Nonetheless, I think the original reason for the holiday is beautiful and worthy of being honored. Also, I like pink and hearts. So, in honor of this classic Halmark Holiday, I have created a Conversation Heart Coffee Cozy. (Tutorial to come.)