This blog is no longer hosted on this site. Check out the new and improved Domestic360 at domestic360life.com for even more DIYs, recipes, and fashion tips!
Showing posts with label crafting. Show all posts

Wednesday, December 19, 2012

Gift Card Envelope - DIY Tutorial

My mom always says that gift cards are impersonal. I disagree. I love gift cards. I love how easy it is to give them and I love getting them and spending them. Its like guilt-free shopping. When we got married we got so many gift cards and it was awesome! We were able to get so much stuff that we needed, even stuff that wasn't on our registry.

The only thing I don't like about gift cards is that they are impossible to wrap and the little envelopes they come in are ugly. There are some cute cards and little tins you can get to put your gift cards in, but who wants to pay extra for that?

So, my solution is to make my own little envelope! It only takes a little scrap of fabric and about 30 minutes to make.

What you will need:

  • One piece of fabric (quilting cotton works really well) - 13" x 3.5"
  • The usual stuff (a sewing machine, matching thread, scissors, an iron, etc...)

Fold the fabric in half length wise, right-sides together. Stitch around the three raw edges using the edge of the foot lined up with the edge of the fabric as a seam allowance, back-tacking and leaving a hole for turning. 

Cut the corners, being careful not to cut the threads.

Pull the fabric though the hole so that its right sides out. Poke out the corners with a corner-turner (or a dull pencil).

Fold the raw edges from the turning hole to the inside. Press all the way around, making sure that the seams are pushed all the way to the edge.

Stitch along the edge of the envelope to close up the hole that was left for turning. I did two lines of stitching, one using the edge of foot, edge of fabric and one as close to the edge of the fabric as I could get. If you want you can just stitch as close to the edge of the fabric as you can.
 
Fold up one half of the envelope 2 and 7/8" to form a pocket. Press and pin.

Stitch around three edges as close to the edge of the fabric as you can. Make sure to back-tack. 
Slip in a gift card and you're DONE!

Friday, December 14, 2012

Christmas Tree Decorating on the Cheap! - Alternative Christmas Trees - Lots of DIY ideas


I am blaming yesterday's lack of a post on the fact that it was the 13th. I had a plan for what I was posting and it just never ended up happening. Anyway... Here is my make up post!

We are trying to save as much money as we can (we want a house!), therefore Christmas is a time of homemade gifts and paper chain decorations. I thought I would share a little bit of my Christmas tree decorating cutting-corners ideas.

I love these ideas! I really hope you try some of them and that they help you save some money this holiday season!

Christmas Trees:
Last year we got a mini tree from Whole Foods (about $25), added a string of lights, a bit of silver rick-rack, and I made ornaments from paint chips. I used a paper punch (a medium-sized circle), then punched holes in the circles and added ornament hooks. The whole thing cost me about $30-$35 dollars. I think its so cute! Very home-made chic.


This year, I didn't spend any money at all on a tree! I used the lights from last year and a picture frame I found on the side of the road (I used it for Jude's birthday party, that's when it got spray painted silver). I nailed in some nails in the shape of a tree, one at the top and seven across the bottom, and just strung the lights from nail to nail. I love the way it turned out, very modern and streamlined.


Here are some other ideas I have seen around the interwebs.

On The Wall
These doesn't take up any extra floor space, perfect for an apartment!

Hang up small paintings and pictures, empty frames, and other little nick-knack in a tree shape. This one doesn't take up any extra floor space, perfect for an apartment!
From Home Spun Threads - link
Just paint an outline of a Christmas tree on a piece of plywood or even on cardboard and then stick all those holiday cards on the tree.
From Materialicious - link
Cardboard
These trees can me made from leftover boxes. Talk about inexpensive!

This one is kind of crazy awesome! It would take a good bit of time, and honestly I don't think I would ever put that much time into a Christmas tree, but it is an amazing piece of art that would last you years (and would earn lots of complements)! Its stacked layers of cardboard that have been carved into a swirly tree shape.

From Inspiration Green - link
I love this! you could paint it or just leave it that lovely cardboard brown. Instructables has all the directions so its not a guessing game. Add some lights to this baby and you've sold me!

From Instructables - link
These are just cut and mini, perfect for a tablescape, or to have a tree in every room of the house! Just cut out various sized squares and rectangles, paint them and glue to a foam tree base. Add a stick and a pot and you are done!
From Shelterness - link

Trimming The Tree
Spending $10 or less to decorate your whole tree!

Garland - 
  • Popcorn and Cranberry Chains - use waxed dental floss to string plain (no butter) popcorn and fresh cranberries. This is a classic! I loved watching White Christmas while stringing these up with my mom and sister.
  • Snow - string different sized cotton balls on clear fishing line. Make sure to space the cotton balls a different intervals so it looks like snow falling naturally. 
  • Paper Chains - cut strips of colorful paper and loop them together using glue or staples to secure. 
  • Mini Pinecones - use clear fishing line to string up mini pinecones. Just wrap the fishing line around the pinecone to secure, add a dot of hot glue to make sure the fishing line stays in place.
  • Paint Chips - cut circles out of colorful paint chips and sew them together, one right next to the other. 

Ornaments -
  • Paint Chips - cut paint chips into ornament shapes (Google it) or just circles and decorate with glitter glue. Poke a hole in  the top and add a hook. Its nice to glue two paint chips together so that there is color on both sides.
  • Christmas Card Recycle - save your holiday cards and make ornaments out of them. Cut out the pictures (simple shapes, such as squares and circles, look best) and add a hook. You can also add felt to the back so you don't have just a plain back.
  • Snowflakes - Cut snowflakes out of white paper and hang everywhere! Check out Google and Pinterest for patterns.
  • Mini Tree Party Hats - get cheap party hats from the dollar store. Spray paint them green and add glitter glue to look like lights and ornaments. Glue a circle of green felt to the hat to cover the opening. Add a ribbon to the top and hang on your tree.

I love these ideas! I really hope you try some of them and that they help you save some money this holiday season! Let me know how you save money during Christmas.

Sunday, December 9, 2012

Paintbrush Roll-Up (tutorial) - DIY Easy Sewing Project


My sister, Annie, is way cooler than me. She is four years younger and ever since she was able to be awesome she was as awesome as awesome is. I mean she had three Halloween costumes this year: Frida Kahlo, Max from Where the Wild Things Are, and Davis Bowie. I mean if thats not awesome, I don't know what is!
 

Annie is an amazing artist. She is an art major and one of her favorite mediums is painting. I have been meaning to make her some art supplies totes and cases. I want to make her a pencil case, a bag, a sketch book cover, a colored pencil roll-up, and so many other things! At the rate I'm going she will be graduated and on to living her awesome life before I get any of it made.

For Christmas I made her this awesome Paintbrush Roll-Up. Its really easy, a perfect beginning sewing project. It doesn't take a lot of fabric and can be put together in an afternoon.


Confession: Every once in a while (read: more often than I would like to admit), when I make up my own patterns, I have moments of sheer stupidity. With this project it was that I totally forgot to cut two pieces for the main body of the roll-up. It was a moment of "OMG! Corey, what were you thinking?" Thankfully, this was not a big oops, easy to fix, just cut one more piece of fabric. The only fabric I had that matched the other fabrics was a scrap from another project, so I stitched up the scrap and went with it. The only problem I had with this scrappy fabric was that it had a slight stretch. I would not suggest using anything with stretch.

Paintbrush Roll-Up
What You Will Need:

  • two pieces of fabric cut to 22" x 19"
  • one piece of fabric cut to 22" x 2.5"
  • two pieces of fabric cut to 18" x 2.5"


Fold each 18" x 2.5" (the long skinny pieces) in half right sides together. Stitch up the long sides using a 1/4" seam allowance. Hook a safety pin in one end of one of the tubes, feed the safety pin back through the tube until it comes out the other end. Keep pulling the tube thought itself so that its all right-side-out.


Fold one end of the tubes inside and stitch it up. 


Pin the 22" x 2.5" piece along the right 22" side of the main piece, right sides together. It should be 1" from the edge. Stitch along the right side edge of the 22" x 2.5" piece. Fold and press the 22" x 2.5" over so that the right side of the fabric is on the right side.


Layer the two large pieces of fabric on top of each other with right sides together. Pin the tie strips, with the unfinished ends stitching sticking out and the strips on the inside of the sandwich. Make sure you leave a hole for turning, I make this with thee pins as I did in the picture. Using a 1/2" seal allowance stitch around the outside edge of the sandwich, leaving that hole for turning. Trim the corners. 


Pull the sandwich through itself so its right sides out. Press. Fold the raw edge that was left for turning to the inside and pin. Fold up the bottom (the 18") edge 5", pin in place. This is what will create the pocket for the paintbrushes. Top stitch around the edge of the whole roll-up, using the edge of the presser foot lined up with the edge of the fabric as a seam allowance.


Using chalk or a washable fabric marker marker the stitch lines for the pockets. These lines should run the full length of the roll-up. The lines can be the same width or various. I made the pockets varied from 3/4" to 2" wide. Stitch along these lines from top to bottom. Make sure you don't catch the ties in the process. Brush off the chalk or use a damp cloth to gently rub it off. 


Add paintbrushes (or pens, pencils and markers) and fold over the top edge (should be about 4").  Roll up the case and tie  it off. There you have it! Good to go to art class!


I just LOVE the way this turned out! I can't wait to give it to my sister. She will have many more paintbrushes than I do to fill it with. I am sure she will love this as much as I do. Yay for easy sewing projects that turn out so wonderfully!

Here are some more photos to show how great this project is.
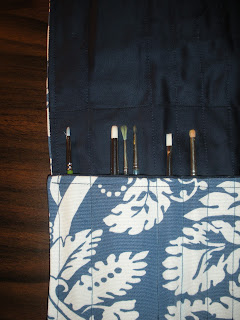
 

P.S. This is perfect for pencils, colored pencils, markers, a highlighter collection, pens, crochet hooks, short knitting needles, etc...


Saturday, December 8, 2012

Holiday Crafts - Deck Your Arms!

For some reason our Mac (aka, my everyday computer) won't let me upload my photos so I can post them on here. We have a laptop, but my husband has taken it to work and forgot to bring it home for the weekend. Hence the reason I haven't posted any of my own DIY projects. So until my husband brings home the laptop I am going to share two projects from my friend Camille's blog: life in mod

Camille, the beautiful mother/model friend of mine from high school, has a great blog all about being a stylish mama and how not to fall into the "mom jean" trap. I love reading her styling tips, and daily life tid bits, but her DIY projects are so fun! They are creative and totally doable durring nap-time.  

Here are two of her holiday projects:


I really want to make both of these projects! Leave a comment and let me know how yours turns out!

XOXO,
Coco


Monday, December 3, 2012

A Craftster's Wish List

With Christmas fast approaching, I can't help thinking about what I am writing in my letter to Santa. Its will look something like this:

Dear Santa,
I have been really good this year. Yes, there have been times when I lost my temper with my husband and with my baby. There were times when I may have pretended not to smell that stinky diaper so that my husband would think he was the first to smell it and therefore have to change it. There may have been times when I make cookies under the guise of giving them to the maintenance men (and I did!) and then eaten half the batch. There may have been times when I watched Sister Wives instead of doing the dishes or yoga.

But Santa, I know you are a kind and forgiving gentleman who always looks for the best in people. And I know you see the best in me. So, without farther ado let me get to my list for this year.


I would like (in no particular order):

An Akro-Mils Hardware and Craft Cabinet. This would be perfect for helping me to organize all my little nicks and nacks in my craft and sewing studio. 
A Bobbinsaver Bobbin Organizer (in pink or purple, but I'm not picky). This would be a really great thing for me to have so that my bobbins dont get unraveled or roll away. 


A self-healing cutting mat, like this one. Its an Alvin Professional Cutting Mat. I would like a large size such as an 42"x30" or bigger. I know I had one in college and left it in the trunk for too long and now its all warped and broken. Please bring me a new one so I can use my rotary cutter and exacto knife again.


Some really awesome fabric. Can't be too specific, but one can never have too much fabric. Fat quarters would be great! Check out Hawthorne Threads,  Etsy, Spoonflower, and my Pinterest board Fabric I Need.


About a dozen Dritz Quilting Folding Seam Rippers. These are my all time favorite seam rippers and I am always misplacing mine. They fold up so you are never worried about sticking yourself, they are skinny and sharp so they work very well. They are really hard to find in the stores and I could use a bunch of back ups.


A Gutermann In-Home Sew-All 100-Color Thread Assortment. I mean, every girls dream, right?
Thank you, Santa, for reading my letter. I really hope you are staying warm in the North Pole and that Mrs. Claus is making you lots of hot chocolate. Please make sure to rest up so that you can be ready to go on Christmas Eve.  I will leave out cookies and carrots.

Much love,
Corey

PS, Please give my love to the elves, especially Buddy.