My grandmother is a very proud member of the Daughters of the American Revolution. Remember Emily (the mother/grandmother) from Gilmore Girls? She was a high society DARer, they had high teas and judged everyone. Major gossiping and a lot of keeping up with the Joneses. My grandmother, Mimi, is just an endearingly eccentric member of a society committed to doing good in the community, spreading American pride, and restoring historic properties. From what I have experienced with her DAR chapter, its a really lovely group of (mostly) older ladies who just love this country and its exciting history.
While I was in college my Mimi asked me to make her a colonial costume for her to wear to her DAR events. They often have teas and social events where it is appropriate to dress up as your Revolutionary War ancestors. I didn't have time to work on it durring college and had totally forgotten about it until this summer when she asked me to tackel the project again. This time I was interested.
It took me a few weeks worth of nap time sewing blitzes, but it finally done. Just in time too! Mimi's DAR Christmas party is this week. I am so excited for her to see it and be able to wear it to her Christmas party.
Mimi said she didn't really care if it wasn't historically accurate (meaning I could use a zipper) so I used the Simplicity pattern # 2354. I had to make some adjustments and alterations. I added lace to the cuffs. The sleeves were ridiculously long, so I added some ruching to them. I didn't do the ribbom detail on the stomacher because I just didn't like it. I had to tea dye the bodice fabric because it was much to bright white. The pattern was pretty simple to put together and if I didn't have a little one tugging at me all the time it would have been done much more quickly. I think it turned out really nicely, check it out and let me know what you think!
This blog is no longer hosted on this site. Check out the new and improved Domestic360 at domestic360life.com for even more DIYs, recipes, and fashion tips!
Showing posts with label x-mas. Show all posts
Monday, December 10, 2012
Sunday, December 9, 2012
Paintbrush Roll-Up (tutorial) - DIY Easy Sewing Project
My sister, Annie, is way cooler than me. She is four years younger and ever since she was able to be awesome she was as awesome as awesome is. I mean she had three Halloween costumes this year: Frida Kahlo, Max from Where the Wild Things Are, and Davis Bowie. I mean if thats not awesome, I don't know what is!
Annie is an amazing artist. She is an art major and one of her favorite mediums is painting. I have been meaning to make her some art supplies totes and cases. I want to make her a pencil case, a bag, a sketch book cover, a colored pencil roll-up, and so many other things! At the rate I'm going she will be graduated and on to living her awesome life before I get any of it made.
For Christmas I made her this awesome Paintbrush Roll-Up. Its really easy, a perfect beginning sewing project. It doesn't take a lot of fabric and can be put together in an afternoon.
Confession: Every once in a while (read: more often than I would like to admit), when I make up my own patterns, I have moments of sheer stupidity. With this project it was that I totally forgot to cut two pieces for the main body of the roll-up. It was a moment of "OMG! Corey, what were you thinking?" Thankfully, this was not a big oops, easy to fix, just cut one more piece of fabric. The only fabric I had that matched the other fabrics was a scrap from another project, so I stitched up the scrap and went with it. The only problem I had with this scrappy fabric was that it had a slight stretch. I would not suggest using anything with stretch.
Paintbrush Roll-Up
What You Will Need:
- two pieces of fabric cut to 22" x 19"
- one piece of fabric cut to 22" x 2.5"
- two pieces of fabric cut to 18" x 2.5"
Fold each 18" x 2.5" (the long skinny pieces) in half right sides together. Stitch up the long sides using a 1/4" seam allowance. Hook a safety pin in one end of one of the tubes, feed the safety pin back through the tube until it comes out the other end. Keep pulling the tube thought itself so that its all right-side-out.
Fold one end of the tubes inside and stitch it up.
Pin the 22" x 2.5" piece along the right 22" side of the main piece, right sides together. It should be 1" from the edge. Stitch along the right side edge of the 22" x 2.5" piece. Fold and press the 22" x 2.5" over so that the right side of the fabric is on the right side.
Layer the two large pieces of fabric on top of each other with right sides together. Pin the tie strips, with the unfinished ends stitching sticking out and the strips on the inside of the sandwich. Make sure you leave a hole for turning, I make this with thee pins as I did in the picture. Using a 1/2" seal allowance stitch around the outside edge of the sandwich, leaving that hole for turning. Trim the corners.
Pull the sandwich through itself so its right sides out. Press. Fold the raw edge that was left for turning to the inside and pin. Fold up the bottom (the 18") edge 5", pin in place. This is what will create the pocket for the paintbrushes. Top stitch around the edge of the whole roll-up, using the edge of the presser foot lined up with the edge of the fabric as a seam allowance.
Using chalk or a washable fabric marker marker the stitch lines for the pockets. These lines should run the full length of the roll-up. The lines can be the same width or various. I made the pockets varied from 3/4" to 2" wide. Stitch along these lines from top to bottom. Make sure you don't catch the ties in the process. Brush off the chalk or use a damp cloth to gently rub it off.
Add paintbrushes (or pens, pencils and markers) and fold over the top edge (should be about 4"). Roll up the case and tie it off. There you have it! Good to go to art class!
I just LOVE the way this turned out! I can't wait to give it to my sister. She will have many more paintbrushes than I do to fill it with. I am sure she will love this as much as I do. Yay for easy sewing projects that turn out so wonderfully!
Here are some more photos to show how great this project is.
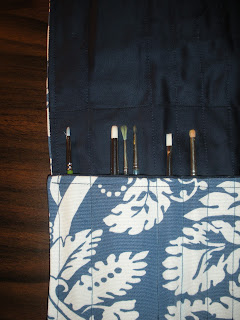
P.S. This is perfect for pencils, colored pencils, markers, a highlighter collection, pens, crochet hooks, short knitting needles, etc...
Labels:
25 days of christmas,
case,
crafting,
crafts,
creative,
custom,
diy,
easy,
fast,
free pattern,
gifts,
homemade,
pattern,
pencil case,
project,
sewing,
stocking stuffer,
x-mas
Saturday, December 8, 2012
Holiday Crafts - Deck Your Arms!
For some reason our Mac (aka, my everyday computer) won't let me upload my photos so I can post them on here. We have a laptop, but my husband has taken it to work and forgot to bring it home for the weekend. Hence the reason I haven't posted any of my own DIY projects. So until my husband brings home the laptop I am going to share two projects from my friend Camille's blog: life in mod.
Camille, the beautiful mother/model friend of mine from high school, has a great blog all about being a stylish mama and how not to fall into the "mom jean" trap. I love reading her styling tips, and daily life tid bits, but her DIY projects are so fun! They are creative and totally doable durring nap-time.
Here are two of her holiday projects:
Camille, the beautiful mother/model friend of mine from high school, has a great blog all about being a stylish mama and how not to fall into the "mom jean" trap. I love reading her styling tips, and daily life tid bits, but her DIY projects are so fun! They are creative and totally doable durring nap-time.
Here are two of her holiday projects:
I really want to make both of these projects! Leave a comment and let me know how yours turns out!
XOXO,
Coco
Wednesday, December 5, 2012
10 Recipes to Try this Christmas!
I love to bake.
And cook.
And eat.
I really love to eat.
I mean, who doesn't, right?
One of the best things about the holidays is all of the food. Traditional favorites, and new creations! This year I comprised a list of all the recipes I want to try. Some I have already made and they turned out wonderfully, others are on my (ever increasing) To Do list.
Check out my list of Top Ten Recipes to Try and let me know how they turn out for you!
1. Chocolate Pie with Toasted Coconut Pie (made this for Thanksgiving, OMG good! Dark chocolate and coconut, where can you go wrong? With only 5 ingredients its a perfect little pie.)
2. Baked Hawaiian Ham and Swiss Sandwiches (these looks so good! There always seems to be tons of leftover ham at every family event, so why not make these the next day for all of those house guests?)
3. Peppermint Bark Cheesecake (apparently, this is a Cheesecake Factory knock-off recipe. I don't really go to the Cheesecake Factory ever so I wouldn't know, but I do LOVE peppermint bark and I LOVE cheesecake, so why not combine the two? Hello awesomeness!)
4. Frozen Whip Cream Shapes (how cool is this? Some people are totally brilliant. This is not a hard thing to think of, simply make whipped cream and spread it on a sheet; freeze then cut into fun shapes with cookie cutters and watch it melt in your mug of hot chocolate.)
5. Chocolate Peanut Butter Fudge (made this last week. Having never made fudge before, this recipe was super straight-forward and it turned out unbelievably delicious.)
6. Cranberry Ice Cream Pie (another from the Brown Eyed Baker, I just love her recipes. This pie looks so yummy and I think it would be a nice addition to the warm pies that are usually serves with Christmas dinner, or even better for Christmas Eve.)
7. Grasshopper Bars (I have made these before. My husband who isn't a huge sweets person is still talking about how much he likes these bars. They are perfect for this time of year because of the wonderful minty green color.)
8. Gingerdoodles/Snickersnaps (if gingersnaps and snickerdoodles had a love child these cookies would be that baby. Making them for my sister-in-law's cookie exchange.)
9. Homemade Hot Cocoa Mix (this has been on my to do list for a while. I love the idea of making my own mixes and this time of the year I seem to be drinking a ton of hot cocoa. Why not make my own mix, save money and I won't be worried about all the chemicals in the stuff in the packets. This would also make a great holiday gift.)
10. Melted Snowmen Cookies (how stinking cute are these guys?)
Saturday, December 1, 2012
25 Days of Christmas - Evelyn and Anna Style!
Welcome to my 25 Days of Christmas blogging extravaganza!
Starting today (December 1st) and every day until Christmas I will be posting something wonderfully Christmas. Stay tuned for recipes, tutorials, decorating tips, and general inspiration for a wonderful and magical holiday season!
I love, love, LOVE the days leading up to Christmas. I can'g get enough of the preparations the family time, the cookies, the music and cheesy movies (thank you ABC Family!), the hot chocolate, the kids with glowing faces, and pretty much everything that has to do with the holiday.
I love making gifts for my friends and family, so I will be posting plenty of great gift ideas and tutorials for how to make your friends and family some awesome homemade gifts. This is the only time I don't want my friends and family to read my blog, but I am hoping my F&F (friends and family, yeah, I'm clever) don't get a whiff of what I am making them before the 25th.
Dear F&F,
If you read my blog and find out what you are getting, just act surprised on Christmas morning. Thanks!
Love,
Corey
XOXO,
Coco
Subscribe to:
Posts (Atom)


