This blog is no longer hosted on this site. Check out the new and improved Domestic360 at domestic360life.com for even more DIYs, recipes, and fashion tips!

Wednesday, February 27, 2013

Spoonflower Fabrics

I will admit I have a slight fabric addiction. I can't help but collect wonderful printed cotton, and beautiful wovens, and scrumptious knits. I can always find something to make with whatever fabrics I have and I can't seem to help myself from imagining the projects that will be made out of a specific piece of fabric. Sometimes I have to restrain myself from browsing the aisles of fabric stores so I don't over spend.

One of my new favorite pastimes, is seeing what amazing fabrics are available on the internet. Its incredible! There is a whole new world, full of fun bright colors and styles! Its especially exciting to look for prints and quilting cottons.They have everything you could ever imagine on the internet, fabrics in millions of  prints and styles and colors. Nothing like the everyday stuff you find in a chain fabric store. The verity of fabric right at your fingertips is just great. Buying your fabric online is certainly the way to make your projects unique.

Spoonflower.com is one of the coolest fabric websites out there. This is place to go for the most unique and special fabrics. On Spoonflower you can create your own fabric or get a piece of hand-designed fabric of someone else's design. Its truly amazing what you can find of this website. I could spend hours being sucked into the world of Spoonflower. 

I finally got an excuse to buy some fabric from Spoonflower. A friend of mine from college asked me to make her a strap for her new camera.  She wanted a print that was tribalesque and had too many colors and patterns to clash with anything. I loved this goal, something that was so bold and awesome on its own that it went with everything, and at the same time nothing. 

We shopped around for the perfect fabric and ended up finding it on Spoonflower. I was actually giddy to order this fabric. I have been wanting to order something from this company for a long time, and I finally got my chance! I even ordered a little extra so I could have some for a future project.

I didn't even wait to get up to my apartment to open the package. I opened it right away and am so thrilled to share my experience with you!

Yay!

Isn't it pretty presentation?

How awesome is this print? SO AWESOME!

I highly recommend purchasing some fabric from Spoonflower.com, its so worth the little extra money to have something so unique. 


Tuesday, February 26, 2013

Coming Soon...

The past few weeks have been full of on-going and unfinished projects. I have been working on a bunch of different  special projects for a few different people. I've got a wedding gift, some baby gifts, a going-away present, a "just-because" present, and a few Etsy orders.

I've always got too many projects in some stage of completion  that's just how it is for me. I still have some projects from high school that aren't finished. I don't have any excuse other than a short attention span.

So, in lieu of a finished project or something, here are a few pictures to tied you over until I get something finished and posted.


Colorful hexie scraps

A little hexie
A love note key chain 
A dress in the making...
Painting a shirt with a doily as a stencil


Monday, February 18, 2013

Woah! Evelyn and Anna becomes Domestic 360

I have been doing a lot of thinking, praying, and brainstorming about what I want this blog to be and what my goals are... blah, blah, blah. While I love the name Evelyn and Anna (roughly named after my great-grandmothers), I don't think it clearly describes what I really want to be happening here. 

My goal is to provide a place for people to find good quality information. Information like: craft and sewing projects, patterns and tutorials, recipes, home decorating tips, party and hosting ideas, kids projects, yummy recipes, homemaking info, etc... Pretty much anything that has to do with being domestic. 

I also really want to open up the outlets for creative collaboration. I would like to have guest posters who can really add great content for the readers of this blog. I am currently on the look out for people who might be interested in doing some guest posting, so if that's you give me a shout out!

In all of this thinking and brainstorming (thanks to my wonderful hubby for putting up with tons of idea bouncing), I have decided on a name that I think really fits with the goals and mission of this blog. A name that shows what is really going on here and a name that can grow with the blog. 

DOMESTIC 360 

That's it folks. Evelyn and Anna is now Domestic 360. I think it clearly illustrates that we are going for an all around approach to the domestic life, everything from pot roast, to sassy dressed mamas. 

I would love to hear what you think of the new name, leave a comment or shoot me an email. 

As always,
XOXO,
Coco


P.S. I will be keeping Evelyn and Anna as my Etsy shop name, and will continue selling the same kinds of items.

Thursday, February 14, 2013

Pink Strawberry Whoopie Pies

Okay, last whoopie pie recipe post for a while... I promise.

Happy Valentines Day everyone! My husband and I don't really celebrate the holiday, but I love the idea behind the celebrating St. Valentine and what he stood for. I also love pink and chocolate. So, because of these facts I'm posting a pink recipe. 

These are a pretty mild-flavored whoopie pie. They aren't as packed with in-your-face flavor as some of the other whoopies I have made (check out: Birthday Cake, Chocolate Oreo, and Oatmeal Cream), but they are very yummy.

There isn't any chocolate involved in this recipe (insert sad face), but its pretty festive especially considering strawberries seem to be the official fruit of Valentines Day. Plus, I'm sure you could add a little chocolate drizzle or something if you wanted.


Pink Strawberry Whoopie Pies
(Adapted from On Sugar Mountain)

  • 3 cups flour
  • 1 cup brown sugar
  • 2/3 cup vegetable oil
  • 1 cup finely chopped strawberries
  • 2 eggs
  • 1/2 cup sour cream
  • 1 1/2 tsp baking powder
  • 1 tsp baking soda
  • 3/4 tsp salt

Whisk together flour, baking powder, baking soda, and salt in a medium bowl.
Combine oil and sugar, whisking until thoroughly incorporated. Whisk in sour cream and strawberries.
Whisk in eggs, one at a time, until incorporated. Fold in flour mixture in two batches; do not overmix
Cover and refrigerate for 1/2 hour
Preheat oven to 350 degrees and line two baking sheets with parchment paper.
Drop heaping tablespoonfuls of batter onto the baking sheets approx. 2 inch apart (to allow for spreading).
Bake at 350 for 10-12 minutes or until a toothpick comes out clean from one of the cookies.
Let cool on pan for 10 minutes then transfer to wire rack to cool completely.

Strawberry Buttercream
(Adapted from On Sugar Mountain)
  • 1 cup softened butter
  • 1 cup finely chopped strawberries
  • 4 cups powdered sugar
  • 1-2 drops red food coloring

Beat butter until fluffy, then add in powdered sugar. Slowly add in strawberries and food coloring and beat until frosting reaches uniform consistency.

Assembling the Whoopie Pies

Lay out your cakes in pairs (one for the top and one for the bottom) with the flat sides facing up, spread the filling on one of flat-sides of your cakes. You can do this with a spoon or a knife, or used a pastry bag or a cookie scoop. Top this with another cake to create a sandwich. Repeat with the rest of your pies.


For a great Valentine's craft, check out my KISS ME Conversation Heart Coffee Cozy!


Tuesday, February 12, 2013

Chocolate Oreo Whoopie Pie Recipe


As I'm sure you have picked up on, I have been on a Whoopie Pie kick. I made four different flavors for an event the other day and they were all so good. My husband is a huge Oreo fan and he was my inspiration for this pie. Its just a good combination of  flavors.


Chocolate Whoopie Pies
(Adapted from Whoopie Pies, by Sarah Billingsley and Amy Treadwell)

  • 1 2/3 cups all-purpose flour
  • 2/3 cup unsweetened cocoa powder
  • 1 1/2 teaspoons baking soda
  • 1/2 teaspoon salt
  • 4 tablespoons unsalted butter, at room temperature
  • 4 tablespoons vegetable shortening
  • 1 cup (packed) dark brown sugar
  • 1 large egg
  • 1 teaspoon vanilla extract
  • 1 1/4 cup milk
Position a rack in the center of the oven and preheat the oven to 375 F. Line two baking sheets with parchment paper.

Sift together the flour, cocoa powder, baking soda, and salt onto a sheet of waxed paper. In the work bowl of a stand mixer fitted with the paddle attachment, beat together the butter, shortening, and brown sugar on low speed until just combined  Increase the speed to medium and beat until fluffy and smooth, about 3 minutes  Add the egg and vanilla and beat for another 2 minutes.

Add half of the flour mixture and half of the milk to the batter and beat on low until just incorporated. Scrape down the sides of the bowl. Add the remaining flour mixture and milk and beat until completely combined.

Using a spoon or cookie scoop, drop about 1 tablespoon of batter onto one of the prepared baking sheets and repeat, spacing them at least 2 inches apart. Bake on sheet at a time for about 10 minutes each or until the pies spring back when pressed gently. Remove from the oven and let the cakes cool on the sheet for about 5 minutes before transferring them to a cooling rack to cool completely.

Oreo Cream Cheese Filling
  • 6 oz. cream cheese (softened)
  • 1/4 cup butter (softened)
  • 4 tablespoons Greek yogurt (the thicker the better)
  • 4-5 cups powdered sugar
  • 1/4 teaspoon vanilla extract
  • 3/4-1 cup crushed Oreo cookies 
Cream together the cream cheese and butter until smooth. Add yogurt and bead until smooth. Add powdered sugar one cup at a time until thick. Add vanilla and Oreos and mix until combined. 

*** SUBSTITUTION NOTE***
You can use just a block of 8 oz. cream cheese and not use the butter and yogurt, if you do this you will only need about 3-4 cups of powdered sugar. I like using the butter and yogurt recipe, because I think the taste is really great.

Assembling the Whoopie Pies

Lay out your cakes in pairs (one for the top and one for the bottom) with the flat sides facing up, spread the filling on one of flat-sides of your cakes. You can do this with a spoon or a knife, or used a pastry bag or a cookie scoop. Top this with another cake to create a sandwich. Repeat with the rest of your pies.


Monday, February 11, 2013

Homemade Oatmeal Cream Whoopie Pies

I am not a huge fan of oatmeal cream pies, all wrapped up in their plastic wrappers, tasting way too sweet and kind of bland. But theses little whoopie pies are incredible. I mean out of this world good! The cookie part is soft, chewy, and lightly spicy; and the marshmallow cream filling is light, fluffy, and just sweet enough to keep you coming back for more.


I really can't recommend this recipe more highly. I think I tasted them and said "OMG!" I'm a little ashamed to admit that I let such a trendy saying escape my lips in reaction to these wonderful little whoopie pies, but it was a moment of pure bliss. Thank goodness the only person home with me at the time was my 16 month-old, and I don't think he will tell on me.

Homemade Oatmeal Cream Whoopie Pies
(Adapted from Whoopie Pies, by Sarah Billingsley and Amy Treadwell)

  • 4 tablespoons unsalted butter, at room temperature
  • 1/2 cup (packed) brown sugar
  • 1/4 cup granulated sugar
  • 2 large eggs
  • 1 teaspoon vanilla extract
  • 1 1/2 cups rolled oats (not fast-cooking)
  • 3/4 cup all-purpose flour
  • 1/2 teaspoon baking soda
  • 1/2 teaspoon ground cinnamon
  • 1 teaspoon salt
Preheat the oven to 350 F. Line two baking sheets with parchment paper.

In the work bowl of a stand mixer fitted with the paddle attachment, beat together the butter and both sugars on low speed. Increase the speed to medium and beat until fluffy and smooth, about 3 minutes. Beat in the eggs one at a time. Add the vanilla and beat until light and creamy, about 3 minutes

In a food processor or blender, process 3/4 cup of the oatmeal until it resembles whole grain flour. Transfer the ground oatmeal to a medium bowl and add the remaining oatmeal, flour, baking soda, cinnamon, and salt. Add the oatmeal mixture to the butte-sugar mixture and beat on low speed until just combined.

Using a spoon or cookie scoop, drop about 1 tablespoon of batter onto one of the prepared baking sheets and repeat, spacing them at least 2 inches apart. Bake on sheet at a time for about 11 minutes each or until the cookies begin to brown. Remove from the oven and let the cakes cool on the sheet for about 5 minutes before transferring them to a cooling rack to cool completely.


Classic Marshmallow Filling
(Adapted from Whoopie Pies, by Sarah Billingsley and Amy Treadwell)


  • 1 1/2 cups Marshmallow Fluff
  • 1 1/4 cups vegetable shortening
  • 1 cup confectioners' sugar
  • 1 tablespoon vanilla extract
In the work bowl of a stand mixer fitted with the paddle attachment, beat together the Marshmallow Fluff and the vegetable shortening, starting on low and increasing to medium speed until the mixture is smooth and fluffy, about 3 minutes. Reduce mixer speed to low, add the confectioners' sugar and the vanilla  and beat until incorporated. Increase mixer speed to medium and beat until fluffy, about 3 minutes.


***TIP***

Spray the measuring cup and spoon/spatula with cooking spray before measuring Marshmallow Fluff.

Assembling the Whoopie Pies

Lay out your cakes in pairs (one for the top and one for the bottom) with the flat sides facing up, spread the buttercream on one of flat-sides of your cakes. You can do this with a spoon or a knife, or used a pastry bag or a cookie scoop. Top this with another cake to create a sandwich. Repeat with the rest of your pies.


On the last post, Birthday Cake Whoopie Pies, I praised the book Whoopie Pies: Dozens of Mix 'em, Match 'em, Eat 'em Up Recipes, by Sarah Billingsley and Amy Treadwell. I really do love this book. I have gotten many a great recipe from this book. 


Sunday, February 10, 2013

Birthday Cake Whoopie Pies (a Funfetti knock-off recipe)

Whoopie pies have been very popular recently, some might even say trendy. And why not? Whats not to love about whoopie pies? Two cake blobs with an icing center? Simple perfection. Plus, the name is pretty great too. 


One of the greatest things about whoopie pies, is the veneration in flavor combinations. Its pretty much an endless creative march. Anything is possible. Savories, sweets, savory sweets; think banana, peanut-butter and bacon, a whoopie pie fit for a King!


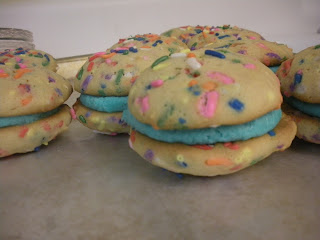
I wanted to make these Birthday Cake whoopie pies because I love sprinkles and I love Funfetti cake. That is pretty much the only box cake mix I ever buy. Its pretty much just a vanilla cake with sprinkles, but there is something about adding sprinkles to something that just makes it ten times more festive. And the bright blue of the buttercream in the middle o f these sandwiches just makes them irresistible.


Birthday Cake Whoopie Pies
(adapted from Whoopie Pies, by Sarah Billingsley and Amy Treadwell)

  •  2 1/4 cups all-purpose flour
  • 1 1/2 teaspoons baking powder
  • 1/2 teaspoon salt
  • 4 tablespoons unsalted butter, at room temperature
  • 4 tablespoons vegetable shortening
  • 1/2 cup granulated sugar
  • 1/2 cup (packed) brown sugar
  • 2 large eggs
  • 1/2 cup buttermilk
  • 2 tablespoons milk
  • 1 teaspoon baking soda
  • 1 teaspoon white vinegar
  • 1 teaspoon vanilla extract
  • 1 cup sprinkles (I used jimmies), and some extra for sprinkling on the cakes
Position a rack in the center of the oven and preheat the oven to 375 F. Line two baking sheets with parchment paper.

Sift together the flour, baking powder, and salt onto a sheet of waxed paper.

In the work bowl of a  stand mixer fitted with a paddle attachment, beat together the butter, shortening, and both sugars until light and creamy, about 3 minutes. Add the eggs and buttermilk and beat until combined.

In a measuring cup, combine the milk, baking soda, and vinegar. Add milk mixture to the batter along with the flour mixture and beat on low until just combined. Add the vanilla and beat on medium for about 2 minutes until completely combined.

Using a wooden spoon, stir in the sprinkles until just incorporated.

Using a spoon or cookie scoop, drop about 1 tablespoon of batter onto one of the prepared baking sheets, sprinkle the tops with some sprinkles and repeat, spacing them at least 2 inches apart. Bake one sheet at a time for about 10 minutes each, or until the cakes begin to brown. Remove from the oven and let the cakes cool on the sheet for at least 5 minutes before transferring them to a rack to cool completely. 

Blue Buttercream
(adapted from Whoopie Pies, by Sarah Billingsley and Amy Treadwell)
  • 3 cups confectioners' sugar
  • 1/2 cup (1 stick) unsalted butter, at room temperature
  • 3-4 tablespoons heavy whipping cream
  • 1 teaspoon vanilla extra 
  • Pinch of salt
  • Gel food coloring (you can use regular liquid food coloring, but the color won't be as intense)
In the work bowl of a stand mixer fitted with the paddle attachment, beat together the confectioners' sugar with the butter, starting on low and increasing to medium speed, until the mixture is crumbly, about 1 minute. Add the heavy cream, vanilla, and salt and beat on high speed until smooth, about 3 minutes. Add the food coloring a little at a time until the desired hue is achieved.

Assembling the Whoopie Pies

Lay out your cakes in pairs (one for the top and one for the bottom) with the flat sides facing up, spread the buttercream on one of flat-sides of your cakes. You can do this with a spoon or a knife, or used a pastry bag or a cookie scoop. Top this with another cake to create a sandwich. Repeat with the rest of your pies. 


I have to say something about the book Whoopie Pies: Dozens of Mix 'em, Match 'em, Eat 'em Up Recipes, by Sarah Billingsley and Amy Treadwell. I love this book. Every recipe I have tried from this book has been wonderful. They have a wonderful way of writing that is just warm and inviting and makes anyone feel like they can tackle what seems to be a tricky dessert. The pictures are pretty (always a must for me) and the little history of whoopie pies (all American!) is just delightful. I got my copy of the book on super clearance, but I would have paid full price if I had known what a treasure this book is.

Saturday, February 9, 2013

Easy Chalkboard Menu Board DIY

I've got so many projects going on right now. I'm feeling the nesting vibe early (at 20ish weeks?)  with this pregnancy. I've been feeling the need to clean, bake, plan (gardens and menus), organize, and create. Its been hard because of my little one running around and playing his favorite game, pull all the toys off the shelf and not play with a single one. He is not allowed in my craft room because there are way too many unsafe (scissors, iron cords, ribbons, etc...) items at his level, so I haven't been able to do much crafting or sewing.

My other problem is that I am having a hard time sticking with one project. The result? Lots of unfinished projects.

One of the projects that I did finish this week, was this really easy Chalkboard Menu Board. The only reason I actually finished it, was because I had a deadline. I had a catering gig, and I needed a menu, thus a finished project!


This project couldn't be any easier! Seriously. Just pick out a pre-cut piece of wood from the craft store ( they have all sorts of different sizes and shapes), paint it with chalkboard paint (I used Martha Stewart's brand, follow the instructions on the bottle), let it dry, and then prop it up on a frame stand and write your menu. DONE! So easy! So simple! Impossible to screw up.


How cute is that? I love it! So useful, its can be used over and over and over and over and over, well you get the idea. I love the look, I really might make a few more and hang them up everywhere! I dare you to take an afternoon and make one of these. 

Leave a comment and let me know what you think!


Thursday, February 7, 2013

Kitchen Trinkets - Treasury Thursday

My friend, Tessa over at Tessacotton, has a great blog and Etsy shop going. She posts fashion advice, nail art tutorials, book reviews, simple recipes, and always has a great giveaway going on. Every Thursday she posts a new Etsy treasury, which is great because it not only reminds me how many awesome products are on Etsy, but also gets my creative juices flowing. Last week I posted a treasury of my own, and I am thinking that Tessa has the right idea. I hope she doesn't mind, but I think I am going to yank her brilliance  and start my own Treasury Thursday campaign.

This weeks treasury has been inspired by my kitchen, or rather, my dream kitchen. I love the bright yellows, blues, reds, and greens. Something about primary (plus green) colors that give such a happy feeling to a room. I also love the mix of vintage and handmade items. If anyone wants to get me some of these items my birthday isn't until September, but my half birthday (half as importaint as my real birthday) is in March.


'My Kitchen' by CoreySue


Tea Drinkers Sidekick Mug, R...
$25.00

Lavender Sprigs: Purple, Lil...
$11.00

Banded Butter Dish in Fig
$74.00

Kitchen Aid Baby, You Spin M...
$19.00

D for Dessert - Alphabet Ce...
$30.00

Happy Yellow Chevron Curtain...
$50.00

RESERVED for Hanna.
$75.00

Vintage Turquoise and Stainl...
$40.00

TeaTowel - Screen Printed Or...
$10.00

IN STOCK: Porcelain Berry Ba...
$40.00

Vintage Stacking Kitchen Can...
$30.00

Hostess Apron with Pocket--T...
$22.50

Opal Owl, Bark Green - Pot H...
$11.00

CRAZY SUPER BIKE Party - scr...
$72.00

SALE// Coffee house, mugs, s...
$15.00

Mini Planters set of 4, Neon...
$29.00

Saturday, February 2, 2013

Craft Room Makeover

Ever since Christmas my craft room has been a black hole. Totally unusable. A dumping ground for all things that we wanted out of the way. Unsorted Christmas and birthday presents, mail and papers, hubby's last semester's text books, not to mention the leftovers from making all those crafts and gifts.

See what I mean?

I have some major crafting coming up for work and play and if I didn't get this joint cleaned up I wouldn't be able to do any of it. I really think it was about to scream if I walked up there one more time to this sight.

So thanks to my dearest love and wonderful husband, who took care of our very demanding son all day. I was able to attack the black hole that was my craft space with a vengeance. I spent pretty much all day (except for an hour or so on Pinterest and Google looking for some inspiration) working, cleaning, organizing, labeling, and throwing away. I also got a pretty good sized pile ready for Good Will. 


It took forever and I think I may have developed a crick in my back, but its worth it! Check  out my newly organized crafting space!

Oh sweet mercy! You can see the floor! I may just be able to create in this space again!
Fat quarters, felt, thread, fabric.
Notions, fabric scraps, glitter, scissors, etc...
Lots of labels!
Pretty yarn, in a cheap basket from the Dollar Store.
Fat quarter, sorted by color. OCD much?
Sheets of felt in a mail organizer.
Ribbon and tape on a pants hanger.