 |
| From our family to yours, Happy Spooking! |
Thursday, October 31, 2013
Wednesday, October 30, 2013
Master Bedroom Pillows Makeover
.JPG)
I think I was on a wedding registry high (pointing that little gun at items is super addictive!) and I didn't think about how mainstream everything would look.
I have since come to my senses and learned that one should never buy everything from the same store. Shopping around is way better. Even if a collection is beautiful, don't buy the whole thing. It just ends up looking like you set up the store display in your house. Zero personality.
I am in love with our duvet cover. So that we will keep. I also love the vintage green crochet chevron blanket at the end of the bed. Its the throw pillows that could use some work. On the one hand I want to start over with our throw pillows. On the other hand I don't want to spend the money it would require to get cute new pillows. Solution: recover the pillows we already have!


P.S. HAPPY HALLOWEEN!!!!!!!
.JPG) |
| This is the pillow that I am getting color inspiration from. Its a combination of teal, chartreuse, Kelley green, navy, purple, magenta, lighter pink, and goldenrod. This pillow sits on a great blue chair over in the corner of our bedroom and it will really pull everything together once the room is done. |
Truthfully, I would love two magenta velvet pillows, but I am not going to fork out the dough for that. So here are some of my fabric ideas.


 |
| Don't you love the little hand of my helper in the corner? |
I would love some input. Do you like these fabrics? Which one is your fave? Which fabrics would you use if it was up to you? Any combination of these or suggestions for different colors or patters or styles. Give me your creative juices!
Leave a comment with your ideas and then enter your email address and follow Domestic 360 for updates as our bedroom gets a little TLC.
Happy Decorating!
Xoxo,
Coco
P.S. HAPPY HALLOWEEN!!!!!!!
DIY Plate Wall
In our old apartment we has super high vaulted ceilings. I spent so much time trying to figure out how to make those walls beautiful. We had some awkward shaped walls too, the wall behind our dining room table was also the wall that was in front of the staircase leading up to our loft. It was this weird angled thing and so hard to decorate. I settled on a plate collage. It was beautiful. I loved it. It brought a ton of color and interest into the space. I hung the plates so that they sort I migrated up the angle if the wall, really embracing the weirdness.
When we moved into our new place in July I quickly hung the plates above our dining room table just as they had been in our old place, though not in the same pattern. And I quickly decided I didn't like it. Nope, the plates just did not have the same effect in this new apartment. At least not on that wall. I was ready to give in the towel and pack up the plates. But my wonderful hubby inadvertently gave me an idea. I think his exact words were "The wall above the stove needs... something." Brilliant Hubby!
My original plan for the wall above our stove was to hang some floating shelves for added storage. But thanks to some creative solutions I didn't really need the extra storage. Plus I wasn't too keen to do the work of installing shelves in an apartment that we aren't planing on being in forever. Once I gave up the idea of shelves over the stove, it opened up a huge blank wall. Enter: Plates.
To make sure the plates formed a good pattern, before I punched any holes in the wall, I traced each plate onto craft paper, cut it out and taped the tracings onto the wall. I played around with the pattern until I got something I was happy with. Then I hung the plates exactly where the tracings were.
I love, love, LOVE the way it turned out. It adds so much color and interest in my tiny kitchen.
 |
| You can kind of see the plate wall in our old place, behind my musical boys. |
 |
| Not working... |
 |
| Sad boring wall. |
 |
| Do this! It makes a huge difference in the finished product and in the process. So much less frustration and guessing. |
 |
| [plates are from Target, Marshals and various thrift stores] |
What do you think of my plate wall? Do you have a wall in your home that is just screaming for something interesting? Leave a comment and let me know!
Xoxo,
Corey
Corey
Monday, October 28, 2013
The Best Banana Bread Recipe Ever!
.JPG)
This is one of my oldest and most trusted recipes. I am not sure where it came from because its been in my recipe scrap book for years and years. I started making this recipe in college and haven't looked for a new one since.
.JPG) |
| as you can see from the stains and notes, this recipe is well loved! |

Like I said, I have been making this particular banana bread recipe for years and years. In that time I have made bread, muffins and mini muffins. I have mixed in walnuts, pecans, chocolate chips, and mini chocolate chips. I have thought about adding peanut butter and chocolate chips. I have thought about adding cocoa powder. I have thought about adding blueberries. I have thought about cutting the banana and adding pumpkin instead. I have thought about baking it in a cake pan and then icing it with cream cheese icing or chocolate, or Nutella, or even salted caramel! Oh so many culinary ideas! (What would you add?)


I have learned a few things after making this recipe so many times. First, do not over fill your pans or muffin liners! This batter will rise quite a bit. I learned the hard way with banana bread burning on the bottom of my oven. Fill whatever your baking pan is only about 1/2-1/3 of the way full. Second, make sure to check with a toothpick for done-ness (technical term) and check a few places when making bread. The bread will usually be a lovely golden brown and still gooey in the middle. I usually let it get a nice color and then cover with tin foil to finish baking through. Third, you can make this recipe with or without a mixer. If you have the arm strength/willingness to cream the butter and sugar the rest is a breeze. Forth, one banana equals about half a cup, so you will need roughly four bananas for this recipe. Fifth, experimenting with flavors is awesome! My favorite is chocolate chips or mini chocolate chips is making mini muffins. Sixth, shmere with butter or cream cheese and have some coffee.

I really hope you enjoy this recipe. It the best banana bread recipe I have encountered.
 |
| follow me on instagram (@coreysuzanne) for more yummy inspiration! |
What mix-ins do you add to your banana bread?
Coco

The Best Banana Bread
- 2 teaspoons lemon juice
- 2 cups mashed bananas (about 4 large over-ripe bananas)
- 1 cup butter, softened
- 2 cups granulated sugar
- 4 eggs (room temperature)
- 2 teaspoons pure vanilla extract
- 3 1/2 cups flour
- 2 teaspoons baking soda
- 2 teaspoons baking powder
- 1 teaspoon salt
- 1 cup sour cream (or plain Greek yogurt)
- 1 cup chopped nuts, chocolate chips, blueberries, etc... (optional)
Preheat the oven to 350 F. Grease and flour three loaf pans, or put liners in muffin tins.
Mash bananas and mix with lemon juice to prevent browning. Set aside.
Cream the butter and the sugar and beat until fluffy. Add the eggs one at a time, beating well after each addition. Add the vanilla and beat until well combined. Beat in bananas.
Sift all dry ingredients (flour, baking soda, baking powder, and salt) together.
Add the flour and sour cream to the butter alternatively, starting and ending with the flour. Mix well after each addition. (Add 1/3 of the flour mixture to the butter mixture, mix until combined. Add 1/2 of the sour cream to the butter mixture, mix until combined. Add 1/3 of the flour mixture to the butter mixture, mix until combined. Add 1/2 of the sour cream to the butter mixture, mix until combined. Add 1/3 of the flour mixture to the butter mixture, mix until combined.)
Fold in nuts, chocolate chips, blueberries, etc...
Pour batter into greased pans or spoon into muffin cups. DO NOT over fill pans. Bake at 350 F for 30-40 minutes for loaf pans, 17-20 minutes for regular-sized muffins, 12-15 for mini-sized muffins, or until a toothpick that is inserted into the middle of the bread comes out clean. If the bread has developed a golden brown color but hasn't baked all the way through, cover with tin foil and bake until done.
Friday, October 25, 2013
Toddler Infinity Scarf
I just wanted to post a little brag. Just a little one.
The other night I was messing around with some yarn scraps and ended up making a scarf for my little J. It only took a movie or two of crocheting, and it turned out so well!
I wish I could share the tutorial with you, but I don't know how to write a crochet tutorial. I can tell you I made a circle with a chain stitch that I thought would be a good size and then kept going around and around with a double crochet stitch until I got the width I wanted.
It has a really great infinity twist to it. I honestly have no idea how I did that little twist, but its great! The colors are really nice and unisex so my kiddos can share if J ever gives it up. He loves it and I am so glad! He goes around proudly declaring "Mommy make starf for J!" It warms my heart every time he asks to wear it.

Xoxo,
Coco


The other night I was messing around with some yarn scraps and ended up making a scarf for my little J. It only took a movie or two of crocheting, and it turned out so well!
I wish I could share the tutorial with you, but I don't know how to write a crochet tutorial. I can tell you I made a circle with a chain stitch that I thought would be a good size and then kept going around and around with a double crochet stitch until I got the width I wanted.
It has a really great infinity twist to it. I honestly have no idea how I did that little twist, but its great! The colors are really nice and unisex so my kiddos can share if J ever gives it up. He loves it and I am so glad! He goes around proudly declaring "Mommy make starf for J!" It warms my heart every time he asks to wear it.
Happy Friday!

Xoxo,
Coco


Thursday, October 24, 2013
Big Ideas for a Small Kitchen
There has been a lot of food and recipes on Domestic 360 as of late. And, lord knows, I love food, but I think its time to shake things up a bit.
A few months ago we moved from our first ever R&C together apartment and in to a new (to us) apartment. We had lived in one of those mega apartment complexes, the ones where you are referred to as your apartment number rather than your name. It was huge and had a pool, a gym, a parking garage, 7 residential buildings and absolutely no character or charm. Needless to say it was a rather impersonal experience. Aside from the neighbors we knew from church, we never spoke to anyone who lived around us. Save a few mumbled hello's spoken in passing or an occasional sorry-my-one-year-old-who-is-just-learning-to-walk-ran-into-your-leg-and-caused-you-to-drop-all-your-groceries look, there was no interaction between tenants. After three years we were ready for a change.
We moved into a lovely apartment on the top floor of a beautiful old Victorian home. We now live on an avenue lined with historic homes and chatty neighbors. This is the kind of neighborhood dreams are made of. Everyone knows everyone and everyone likes everyone. There are block parties when the street is shut down so the kids can ride their bikes on the road, there are pie baking competitions, and garden harvest sharing. Its ideal. Plus, our apartment has charm, as in trim and built-ins and funky old light fixtures!
The only downside to this new home of ours, is the kitchen is tiny! Its much smaller than our old kitchen. There is very little storage space and the laundry is smooshed into the already cramped space. I knew we were downsizing a little when it came to kitchen space, so I packed away most of my non-essentials, but I don't think I was prepared for how little space we would actually have.
We have about two feet (not exaggerating) of counter space, four drawers, three upper cabinets, and one lower cabinet that isn't under the sink. There just isn't enough storage for a family of four.
Time to pull out the creative storage solutions! We hit up The Container Store and got to work. Here is what we ended up with.
.JPG)
.JPG)
.JPG)
.JPG)
.JPG)
.JPG)
.JPG)
.JPG)
.JPG)
.JPG)
We moved into a lovely apartment on the top floor of a beautiful old Victorian home. We now live on an avenue lined with historic homes and chatty neighbors. This is the kind of neighborhood dreams are made of. Everyone knows everyone and everyone likes everyone. There are block parties when the street is shut down so the kids can ride their bikes on the road, there are pie baking competitions, and garden harvest sharing. Its ideal. Plus, our apartment has charm, as in trim and built-ins and funky old light fixtures!
The only downside to this new home of ours, is the kitchen is tiny! Its much smaller than our old kitchen. There is very little storage space and the laundry is smooshed into the already cramped space. I knew we were downsizing a little when it came to kitchen space, so I packed away most of my non-essentials, but I don't think I was prepared for how little space we would actually have.
We have about two feet (not exaggerating) of counter space, four drawers, three upper cabinets, and one lower cabinet that isn't under the sink. There just isn't enough storage for a family of four.
Time to pull out the creative storage solutions! We hit up The Container Store and got to work. Here is what we ended up with.
.JPG)
Fabulous Elfa drawer storage system from The Container Store acts as the pantry. This small addition took the awkward space between the washer and dryer and the wall and made it useful. This drawer system is what really makes this kitchen functional.
.JPG)
Spice racks from The Container Store with mega magnets (also The Container Store) are on the side of the fridge right above the stove for easy cooking access.
.JPG)
Shelves under the sink for foil, parchment paper, plastic baggies, etc... and a basket for plastic grocery bags hung on the cabinet door.
.JPG)
A plastic basket for under the sink cleaning supplies.
.JPG)
A paper towel bar on the wall, just freeing up a little more counter space. Its the little things that count!
.JPG)
This Polytherm Grid System (The Container Store) is awesome! You can really do whatever you want with it. I keep dishcloths, sponges, and an aloe plant on mine. I also keep bottles in one of the baskets. Its totally flexible because you can get all different sized shelves and baskets that just hook onto the grid, so you can move them all around. (Did I mention there's no dish washer.)
.JPG)
See? Its awesome!
(Make It Pretty Tip: Put your dish soap in a interesting pump container or an olive oil bottle instead of leaving it in the ugly plastic bottle. Mine is in an old hand soap bottle, the pump also makes washing dishes easier and faster.)
.JPG)
We have since gotten rid of our coffee pot in favor of a french press. Not only does it take up WAY less counter space, it looks prettier, and makes better coffee. Win, win, win!
.JPG)
These are just some stackable shelves I had in college that just add more storage .
.JPG)
Another spice rack (a gift from my aunt) and our super cute mail/key rack.
(I feel like I should say the kitchen came this yellow color. It was not my choice.)
Amazingly enough, we ended up with more space than I was thinking we would have. I mean, I even have some empty cabinet space. Its incredible what a little creative organizing can do!
Believe it or not, I love my kitchen. Yes its tiny but, thanks to a little effort, it works beautifully.
I hope I have given you a little inspiration!
Do you have a tiny kitchen? What are some of the things you have done to make it work for you? Creative storage solutions? Leave a comment and let me know!
XOXO,
Coco
Wednesday, October 23, 2013
Healthy Pumpkin Spice Latte in the Crockpot! (paleo - no dairy or refined sugars)
I hope you all are enjoying your fall as much as I have been. I have been loving the cool weather, the subsequent warm clothes, the changing leaves and the pumpkin flavors. I have been posting a lot of pumpkin recipes as of late, mostly because I LOVE pumpkin flavors.
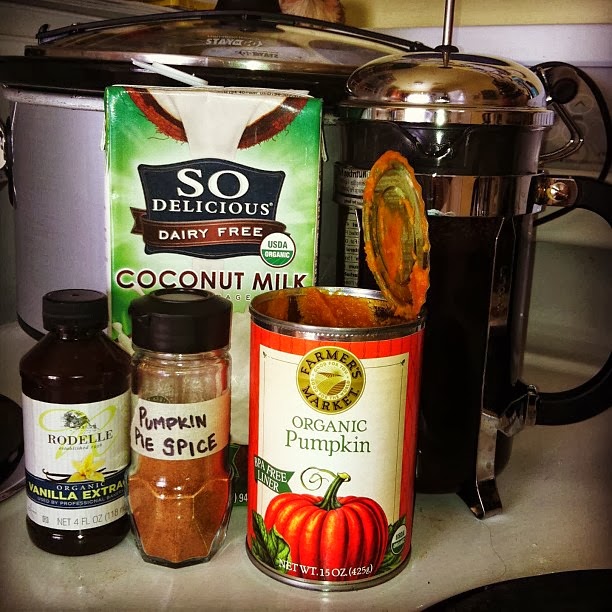
Here is another pumpkin recipe for your enjoyment! This time its a healthy pumpkin spice latte. Yes, that's right, HEALTHY! The lattes you get at any coffee shop are full of nasty things for your body. Preservatives, corn syrup, sugar, oils, dairy, etc... Yuck, yuck, yuck. (Okay, I will admit that I love the Pumpkin Spice Lattes at Sbux, but my body does not.) This recipe is made with whole and nutritious ingredients: coconut milk, pumpkin puree, maple syrup, coffee and spices. All natural and yummy!
I made this in the crock pot for a Harry Potter movie night. We have been working through the Harry Potter series with a friend and my little brother. Its been a blast. I've read the books quite a few times and seen the movies just as many. I am a unrepentant Potterhead. My brother, on the other hand, hasn't read the books (goes against everything I hold dear to let him watch the movie before reading the book, but he is not a reader) so its been so fun to watch him experience the stories for the first time.
There were a few people at our movie showing that are not concerned with healthy eating, and are usually totally turned off by food that is actually good for their bodies. I didn't even tell them this was a paleo drink and they didn't notice. My little J, who is a coffee addict at two years old, loved this latte too.
This recipe made enough for the five of us enjoying the movie and about three cups for me to enjoy over the following days. The original recipe called for a really small amount of coffee and I thought that wasn't enough, so I changed that amount. I also added some maple syrup because I thought it needed a hint of sweetness. I served this with homemade whipped cream that I had in the refrigerator. Usually I would serve something like this with whipped coconut cream, but I had the whipped cream and it tasted lovely.
I would totally recommend this recipe for a cool fall day, perfect for a pumpkin carving party or trick-or-treating. I can just imagine sitting around a bonfire with a cup of this yummy drink and some roasted marshmallows. Throw in a little guitar and an impromptu sing-a-long and you have the perfect fall evening.
It would be so yummy with these paleo pumpkin chocolate chip muffins or this paleo pumpkin bread. Its great hot and chilled. I just put the leftovers into some travel coffee mugs and stuck it in the fridge. When I needed a pick-me-up through out the day I had a gourmet latte ready and waiting. The original recipe says you can make this on the stove top, but that it is better in the crock pot because the flavors have more time to meld. I haven't tried it on the stove top, but I am sure it would be fine.
What are your favorite pumpkin recipes? Leave a comment and let me know!
Happy fall!!
XOXO,
Coco

Pumpkin Spice Latte [paleo - no dairy or refined sugars]
(recipe adapted from Wellness Mama)
Turn crock pot on low for 2 hours until hot and flavors are incorporated.
Top with whipped cream or whipped coconut cream. Serve hot or chilled.
Whipped Cream: In a chilled mixing bowl whip 1 cup cold heavy whipping cream, 1 tablespoon powdered sugar (optional) and 1/2 teaspoon pure vanilla extract. Whip with a mixer or by hand until stiff peaks form. Do not over whip or you will have butter instead of whipped cream.
Whipped Coconut Cream: Put a can of full-fat coconut milk (more info on coconut milk) in the fridge for a few hours. When it has chilled remove the can from the fridge without shaking or jostling too much. Open the can and scoop out the white cream and fat that has risen to the top, be careful not to get the cloudy liquid that has settled to the bottom of the can. Now whip the creamy white coconut cream until you have whipped cream consistency. You can add a small amount of vanilla if you wish.
Other paleo pumpkin recipes:
Here is another pumpkin recipe for your enjoyment! This time its a healthy pumpkin spice latte. Yes, that's right, HEALTHY! The lattes you get at any coffee shop are full of nasty things for your body. Preservatives, corn syrup, sugar, oils, dairy, etc... Yuck, yuck, yuck. (Okay, I will admit that I love the Pumpkin Spice Lattes at Sbux, but my body does not.) This recipe is made with whole and nutritious ingredients: coconut milk, pumpkin puree, maple syrup, coffee and spices. All natural and yummy!
I made this in the crock pot for a Harry Potter movie night. We have been working through the Harry Potter series with a friend and my little brother. Its been a blast. I've read the books quite a few times and seen the movies just as many. I am a unrepentant Potterhead. My brother, on the other hand, hasn't read the books (goes against everything I hold dear to let him watch the movie before reading the book, but he is not a reader) so its been so fun to watch him experience the stories for the first time.
There were a few people at our movie showing that are not concerned with healthy eating, and are usually totally turned off by food that is actually good for their bodies. I didn't even tell them this was a paleo drink and they didn't notice. My little J, who is a coffee addict at two years old, loved this latte too.
This recipe made enough for the five of us enjoying the movie and about three cups for me to enjoy over the following days. The original recipe called for a really small amount of coffee and I thought that wasn't enough, so I changed that amount. I also added some maple syrup because I thought it needed a hint of sweetness. I served this with homemade whipped cream that I had in the refrigerator. Usually I would serve something like this with whipped coconut cream, but I had the whipped cream and it tasted lovely.
I would totally recommend this recipe for a cool fall day, perfect for a pumpkin carving party or trick-or-treating. I can just imagine sitting around a bonfire with a cup of this yummy drink and some roasted marshmallows. Throw in a little guitar and an impromptu sing-a-long and you have the perfect fall evening.
It would be so yummy with these paleo pumpkin chocolate chip muffins or this paleo pumpkin bread. Its great hot and chilled. I just put the leftovers into some travel coffee mugs and stuck it in the fridge. When I needed a pick-me-up through out the day I had a gourmet latte ready and waiting. The original recipe says you can make this on the stove top, but that it is better in the crock pot because the flavors have more time to meld. I haven't tried it on the stove top, but I am sure it would be fine.
What are your favorite pumpkin recipes? Leave a comment and let me know!
Happy fall!!
XOXO,
Coco
Pumpkin Spice Latte [paleo - no dairy or refined sugars]
(recipe adapted from Wellness Mama)
- 4 cups of Unsweetened Coconut Milk (or 2 cans of coconut milk)
- ¼ cup canned pumpkin (without added sugar)
- 2 tablespoons of natural vanilla extract
- ½-1 tsp of pumpkin pie spice ( or ½ tsp cinnamon and a sprinkle of cloves and nutmeg)
- 4 cup of strong coffee
- 1/4 cup maple syrup
- Optional topping: whipped cream or coconut cream (recipes follow)
Turn crock pot on low for 2 hours until hot and flavors are incorporated.
Top with whipped cream or whipped coconut cream. Serve hot or chilled.
Whipped Cream: In a chilled mixing bowl whip 1 cup cold heavy whipping cream, 1 tablespoon powdered sugar (optional) and 1/2 teaspoon pure vanilla extract. Whip with a mixer or by hand until stiff peaks form. Do not over whip or you will have butter instead of whipped cream.
Whipped Coconut Cream: Put a can of full-fat coconut milk (more info on coconut milk) in the fridge for a few hours. When it has chilled remove the can from the fridge without shaking or jostling too much. Open the can and scoop out the white cream and fat that has risen to the top, be careful not to get the cloudy liquid that has settled to the bottom of the can. Now whip the creamy white coconut cream until you have whipped cream consistency. You can add a small amount of vanilla if you wish.
Other paleo pumpkin recipes:
 |
| paleo pumpkin bread |
 |
| paleo pumpkin chocolate chip muffins |
Friday, October 18, 2013
Sweet Potato Cottage Pie (Paleo Freezer Meal)
Cottage pie is one of my favorite comfort foods. It is also one of my go-to meals. Its pretty easy to make and I usually have the ingredients on hand.
When I did my Whole30, I was craving cottage pie and just had to figure out some way to replace the white potatoes in the classic Irish/English dish. I had seen a recipe for sweet potato cottage pie somewhere on Pinterest (follow me!) but it was made with sugary, cinnamon cream cheese. That was not an option. So, I came up with this recipe instead.
The mustard knocks the sweetness of the potatoes down a notch and gives this dish a great savory flavor. This is such a cozy dinner. If you use a cast iron skillet or a dutch oven and bake the sweet potatoes you can even get away with making this dish in one pot! Easy clean up!

I have made extra baked sweet potatoes one night and the next night made this cottage pie. Baked sweet potatoes peel extremely easily and you don't have to reheat them because you are going to toss the whole thing in the oven away!
I am all about freezer meals. Its essential to have some meals made that I can toss in the oven when I don't have time or energy or focus to make anything else. I have had a hard time finding paleo friendly meals that work in the freezer. I am working on a list and would love to hear what you make for your hectic nights. This sweet potato cottage pie is fabulous as a freezer meal. It heats up perfectly!
This recipe makes enough for a family of four. For my family of 2 adults and 2 kiddos I just split the recipe into two pans and have two meals made and ready to go. Usually I will make the full recipe and put half into an aluminum loaf pan and stick it in the freezer and serve the other half for dinner.
As always, I have listed the onion as optional because I just don't ever add onion to my cooking. I do usually add a bit of onion powder for flavor. Also, technically lima beans and peas are not paleo-approved. If you are affected by legumes don't add them.
I really hope you enjoy this dish. I love it and I am really excited to share it with you! Please leave a comment and let me know what you think of the recipe. Feel free to share this recipe on your blog. This is an original recipe so, I just ask that you link back to my blog. Also, share it on Pinterest, Instagram (#domestic360), and Facebook.
xoxo,
Coco
Sweet Potato Cottage Pie
 |
| Follow me on Instagram (@coreysuzanne) for more inspiration (and some cute kiddo pics too!) |
When I did my Whole30, I was craving cottage pie and just had to figure out some way to replace the white potatoes in the classic Irish/English dish. I had seen a recipe for sweet potato cottage pie somewhere on Pinterest (follow me!) but it was made with sugary, cinnamon cream cheese. That was not an option. So, I came up with this recipe instead.
The mustard knocks the sweetness of the potatoes down a notch and gives this dish a great savory flavor. This is such a cozy dinner. If you use a cast iron skillet or a dutch oven and bake the sweet potatoes you can even get away with making this dish in one pot! Easy clean up!

I have made extra baked sweet potatoes one night and the next night made this cottage pie. Baked sweet potatoes peel extremely easily and you don't have to reheat them because you are going to toss the whole thing in the oven away!
I am all about freezer meals. Its essential to have some meals made that I can toss in the oven when I don't have time or energy or focus to make anything else. I have had a hard time finding paleo friendly meals that work in the freezer. I am working on a list and would love to hear what you make for your hectic nights. This sweet potato cottage pie is fabulous as a freezer meal. It heats up perfectly!
 |
| Check out my stash of freezer meals! Perfect for crazy (or lazy) nights. |
As always, I have listed the onion as optional because I just don't ever add onion to my cooking. I do usually add a bit of onion powder for flavor. Also, technically lima beans and peas are not paleo-approved. If you are affected by legumes don't add them.
I really hope you enjoy this dish. I love it and I am really excited to share it with you! Please leave a comment and let me know what you think of the recipe. Feel free to share this recipe on your blog. This is an original recipe so, I just ask that you link back to my blog. Also, share it on Pinterest, Instagram (#domestic360), and Facebook.
xoxo,
Coco
Sweet Potato Cottage Pie
- 1 pound ground beef (grass-fed) could use ground lamb for Shepherds Pie
- 1 cup sliced carrots (or about 2 large carrots)
- 1 cup sliced celery (or about 2 large stalks)
- 1 cup frozen lima beans or peas (leave out for strictly paleo meal)
- 1 tablespoon chopped garlic (or 2 large cloves)
- 1/2 cup chopped yellow onion (optional)
- 1 tablespoon extra virgin olive oil
- 1-2 tablespoons Worcestershire sauce
- 2 teaspoons stake seasoning (optional)
- 1 bay leaf
- 1/2 cup water
- salt and fresh ground black pepper to taste
- 2 medium to large sweet potatoes, peeled and cut into 1" pieces or baked
- 1/2 cup coconut milk
- 2 tablespoons coarse ground horseradish mustard
- salt and fresh ground black pepper to taste
Preheat oven to 350F.
In a large skillet (or dutch oven) set to medium-high heat, drizzle enough olive oil in the pan to lightly coat the bottom. Add the chopped garlic and onion. Saute until the garlic is fragrant and the onion is translucent. Add the ground beef and brown.
Add carrots, celery, Worcestershire sauce, stake seasoning, bay leaf, water, salt and pepper to the skillet. Cover and let simmer until the carrots and celery are cooked.
Meanwhile, boil a salted pot of water and add the sweet potatoes. Boil until cooked through. (Alternatively: stab raw sweet potatoes with a fork all around. bake at 400F for 45 minutes to an hour or until tender. Peal when cool enough to handle.) Drain and return to the pot or a large mixing bowl. Mash the sweet potatoes and add coconut milk, mustard, salt and pepper.
Transfer the beef mixture to a casserole dish (or leave in the skillet if using cast iron or dutch oven). Spoon mashed sweet potatoes over the beef and smooth out to cover the beef.
Bake for 20 minutes or until the sweet potatoes become a little crusty.
FREEZER MEAL OPTION
Prepare as directed above, except transfer beef to an aluminum baking dish and top with sweet potatoes. Cover with tin-foil and label. Freeze for up to 6 months. To reheat: Preheat oven to 425F. Leave foil on and bake for 35-45 minutes. Remove foil and bake an additional 15-20 minutes or until heated through and sweet potatoes are a little crusty.
Thursday, October 17, 2013
Caramel Stuffed Orange Infused Apple Cider Cookies
Every blog I have read about this recipe starts out with a command:

I couldn't agree more. These are incredible. They are chewy and sweet with the zest and spicy bite of apple cider. Now, I'm not a huge fan of cookies without chocolate (exceptions: ginger snaps and oatmeal raisin) but I had to give away most of these for fear of eating nothing else. I gave away about 4 dozen cookies just so I wouldn't have a binge weekend.
I made half of these cookies the way the original recipe says to make them, and the other half I decided to experiment with. When I make hot spiced apple cider I always add a whole orange for flavor. So, I added orange zest to the cookie dough to oomph up the cider flavor. I love what it added to the cookies! I definitely recommend adding the orange zest, but of course its optional and the cookies are wonderful without, just a little less zesty)
The only other changes I made to the recipe was the addition of rolling the cookie balls in a cinnamon-sugar mixture before placing on the cookie sheet, like you would do to a snickerdoodle. This is a must in my opinion.
I used the square Kraft caramels for most of my cookies and when I ran out I used Werther's Original Chewy Caramels. The Werther's Originals are long rectangular shaped and therefore harder to make fit into a round cookie, though not impossible In the end I think they make a better cookie. They don't get hard after the cookies cool down so they are easier to eat and give that nice chewy caramel flavor and texture. The Kraft caramels work just fine, but I think the Werther's Originals are just a little bit better.
These cookies are best warm. They are good room temperature, but when they are warm they are just uber gooey, and chewy, and cinnamon-y, and apple-y, and caramel-y, and autumn-y, and... you get the point. Eat these warm from the oven, or pop them in the microwave for about 7 seconds. Or for the best eating experience, make a cup of hot apple cider (coffee or tea work too) and set your cookie on the rim of your mug. Let the steam from your cider waft up and into your cookie, softening the caramel and creating the perfect crispy on the outside, soft and chewy on the inside cooking eating experience you will ever have the pleasure of, well, experiencing.

Caramel Stuffed Orange Infused Apple Cider Cookies
(recipe adapted from Scrambled Henfruit. Be sure to check out her lovely photos!)
GO MAKE THESE COOKIES NOW!

I couldn't agree more. These are incredible. They are chewy and sweet with the zest and spicy bite of apple cider. Now, I'm not a huge fan of cookies without chocolate (exceptions: ginger snaps and oatmeal raisin) but I had to give away most of these for fear of eating nothing else. I gave away about 4 dozen cookies just so I wouldn't have a binge weekend.
I made half of these cookies the way the original recipe says to make them, and the other half I decided to experiment with. When I make hot spiced apple cider I always add a whole orange for flavor. So, I added orange zest to the cookie dough to oomph up the cider flavor. I love what it added to the cookies! I definitely recommend adding the orange zest, but of course its optional and the cookies are wonderful without, just a little less zesty)
The only other changes I made to the recipe was the addition of rolling the cookie balls in a cinnamon-sugar mixture before placing on the cookie sheet, like you would do to a snickerdoodle. This is a must in my opinion.
 |
| Follow me on Instagram (@coreysuzanne) for more food inspiration! And some other great pics too :) |
These cookies are best warm. They are good room temperature, but when they are warm they are just uber gooey, and chewy, and cinnamon-y, and apple-y, and caramel-y, and autumn-y, and... you get the point. Eat these warm from the oven, or pop them in the microwave for about 7 seconds. Or for the best eating experience, make a cup of hot apple cider (coffee or tea work too) and set your cookie on the rim of your mug. Let the steam from your cider waft up and into your cookie, softening the caramel and creating the perfect crispy on the outside, soft and chewy on the inside cooking eating experience you will ever have the pleasure of, well, experiencing.

Caramel Stuffed Orange Infused Apple Cider Cookies
(recipe adapted from Scrambled Henfruit. Be sure to check out her lovely photos!)
- 1 cup softened butter (2 sticks)
- 1 cup granulated sugar
- 1/2 teaspoon salt
- 1 box (7.4 oz) Alpine Spiced Apple Cider Instant Original Drink mix -not sugar free- all 10 packets (in the grocery store near the hot chocolate mixes.)
- 2 eggs
- 1 teaspoon vanilla extract
- 1 teaspoon baking soda
- 1/2 teaspoon baking powder
- 1 teaspoon ground cinnamon
- 1-2 tablespoon(s) fine orange zest (about two oranges worth) - optional
- 3 cups all purpose flour
- 1-2 bag(s) Kraft Caramels or Werther's Original Chewy Caramels
- Cinnamon-sugar mix (or mix 1/4 cup granulated sugar with 1 tablespoon ground cinnamon)
Preheat oven to 350° F. Line cookie sheets with parchment. (You really need the parchment!
In a small bowl whisk together flour, baking soda, baking powder and cinnamon and orange zest.
In a mixer (or with an energetic spoon) cream together butter, sugar, salt and all 10 packages of apple cider drink mix powder, until light and fluffy.
Beat in eggs, one at a time. Add vanilla and mix well.
Gradually add flour mixture to butter/egg mixture. Mix until just combined.
Refrigerate for about an hour. (If you're really impatient you don't have to do this, but it makes it so much easier to work with.)
When you are ready to bake, unwrap your caramels and put about 1/4 cup cinnamon-sugar mixture into a bowl. Scoop out cookie dough ball about the size of a walnut. (I used a rounded cookie scoop-full. My scoop holds about a tablespoon.)
Flatten the ball of dough slightly in the palm of your hand. Press the unwrapped caramel into the center of your dough and seal the dough around it, covering it completely. Roll the balls in the cinnamon-sugar mixture. Place on parchment covered cookie sheets 2 inches apart.
Bake 12-14 minutes, or until very lightly browned around the edges. Please don't over-bake! Once the cookies are done, slide the parchment off of the baking sheet right out onto the counter. Allow cookies to partially cool on the parchment. When cookies are cool enough to be firm but still slightly warm, carefully twist off of parchment and allow to finish cooling upside down (either on the parchment or on a rack.) If you forget about them and they cool too much and stick to your parchment, put them into the freezer for a few minutes and they'll pop right off.
Yield: about 4 dozen, depending on how large you make your cookies (or how many caramels have been snitched out of your bag before you begin.) Store in an airtight container.
Tuesday, October 8, 2013
Paleo Pumpkin Chocolate Chip Muffins (vegan option)
I have said before that I am a little scared to try new paleo muffin and quick bread recipes, because they often end up tasting much more like a souffle than a muffin. There is just too much egg texture and flavor for my palate. I have been on a success streak with my paleo baking as of late (see Paleo Pumpkin Bread, and Peach Blueberry Nutty Crisp) and I am gung-ho to try some other recipes!


Preheat oven to 350 degrees. Line a muffin tin with paper liners or grease with coconut oil.
This is a new recipe from PaleOMG (super great paleo blog, check it out!). I haven't ever had pumpkin flavors with chocolate and I was a little apprehensive. I know, I know. How silly of me. Of course chocolate goes with pumpkin. Chocolate goes with [pretty much] everything!

These muffins turned out wonderfully! I made five regular sized muffins and nine mini muffins for the little one. J loved them and ate about 6 mini muffins before breakfast was over. I just love that I can give him such healthy food and he will gobble it up!

Once I gotten into making these muffins I realized I only had two eggs and the recipe called for three. Luckily, I remembered having read about replacing eggs in baked goods with chia seeds, this is a popular vegan replacement. When mixed with water, chia seeds form a sort of thick jelly very similar to raw eggs. For replacing eggs you grind up the chia seeds (I used our coffee grinder) and mix with water. I did this for one of the eggs called for in the recipe and used my other two regular eggs. I am pretty sure that if you wanted to make this recipe vegan you could just use the chia seed concoction for all three eggs.
Here is the recipe for vegan egg replacement with chia seeds:
3 tablespoons warm water
1 tablespoon ground chia seeds (use white chia seeds if making something light in color)
Mix water and chia seed meal together with a small whisk or a fork in a small bowl. Let congeal for about 5-10 minutes, or until it is the consistency of a raw egg. Makes one egg replacement

These muffins are wonderful warm with a hot cup of coffee or a glass of apple cider. I love the way the spices play off of the chocolate, it kind of like a Mexican hot chocolate. The pumpkin is subtle and lovely, just the right amount of sweetness. Oh the wonderful, wonderful flavors of fall!
Paleo Pumpkin Chocolate Chip Muffins
(original recipe from PaleOMG)
- ⅓ cup pumpkin puree
- ⅓ cup maple syrup
- ¼ cup coconut oil, melted
- 3 eggs, whisked
- 1 teaspoon vanilla extract
- ¼ cup coconut flour
- ½ teaspoon cinnamon
- ¼ teaspoon nutmeg
- ⅛ teaspoon ground cloves
- ⅛ teaspoon powdered ginger
- ½ teaspoon baking soda
- ½ teaspoon baking powder
- pinch of salt
- ½ cup Enjoy Life Mini Chocolate Chips
Preheat oven to 350 degrees. Line a muffin tin with paper liners or grease with coconut oil.
Mix together wet ingredients in a bowl: pumpkin puree, maple syrup, coconut oil, eggs, and vanilla extract.
In another bowl, whisk together coconut flour, cinnamon, nutmeg, ground cloves, powdered ginger, baking soda, baking powder, and salt.
Pour dry ingredients into wet ingredients and mix well. Fold in chocolate chips.
Using an ice cream scoop or a large spoon scoop batter into lined or greased muffin pans.
Bake for 35-40 minutes. Remove muffins from pan and cool on a wire rack. Enjoy warm or at room temperature.
Subscribe to:
Posts (Atom)